SLZB-Ultima-3 Review: The Ultimate Multi-Radio Smart Home Powerhouse for Home Assistant
If you have been running Home Assistant for a while, you probably know the pain of USB dongle sprawl. For years, my Home Assistant instance has been running inside a Proxmox Virtual Machine (VM) powered by HAOS, utilizing two dedicated USB controllers plugged directly into the host server:
- Silicon Labs EFR32MG21 USB Dongle for Zigbee (
zigbee2mqtt). - Aeotec Z-Stick Gen5 (ZW090) for Z-Wave (
Z-Wave JS).
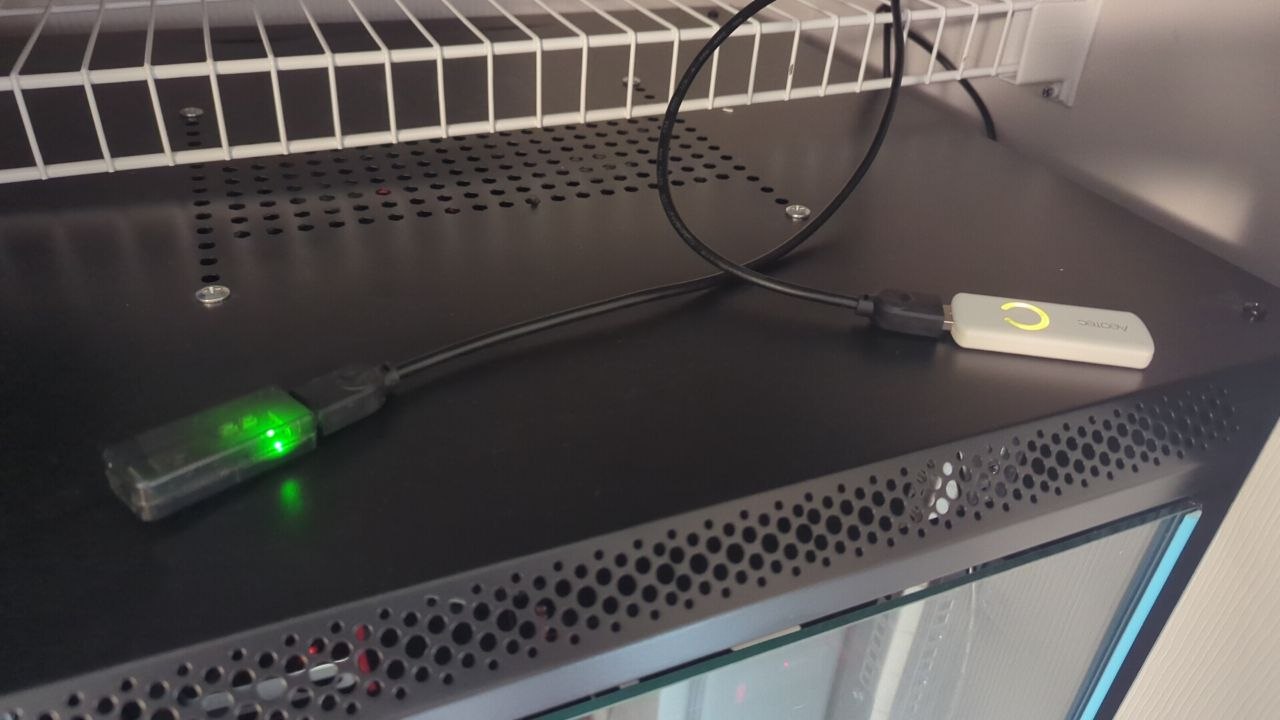
While this setup has served me well across dozens of switches, sensors, sirens, and smart deadbolts, USB passthrough comes with fundamental limitations. Your server rack or networking closet is usually in the basement or a utility room—literally the worst possible location for RF transmission and wireless mesh propagation. On top of that, VM migrations, host reboots, or adding new protocols like Bluetooth (BLE Proxy) or Matter/Thread often result in messy USB hubs, extension cables, and port conflicts.
Enter the SMLIGHT SLZB-Ultima-3.
Called the "Ultimate Smart Home Powerhouse," this modular device decouples your wireless coordinators from your server entirely. By shifting your Zigbee, Thread, Z-Wave, and Bluetooth radios onto your Ethernet network via single-cable Power over Ethernet (PoE), you can mount the gateway centrally in your home for optimal coverage while keeping your Home Assistant server safely tucked away in your rack.
In this comprehensive review, we will explore the hardware architecture, live SLZB-OS benchmarks, how to configure both Zigbee2MQTT and Z-Wave JS over TCP/IP sockets, and compare it against our trusted USB dongles.
1. Hardware Unboxing, Specs & Add-ons Overview
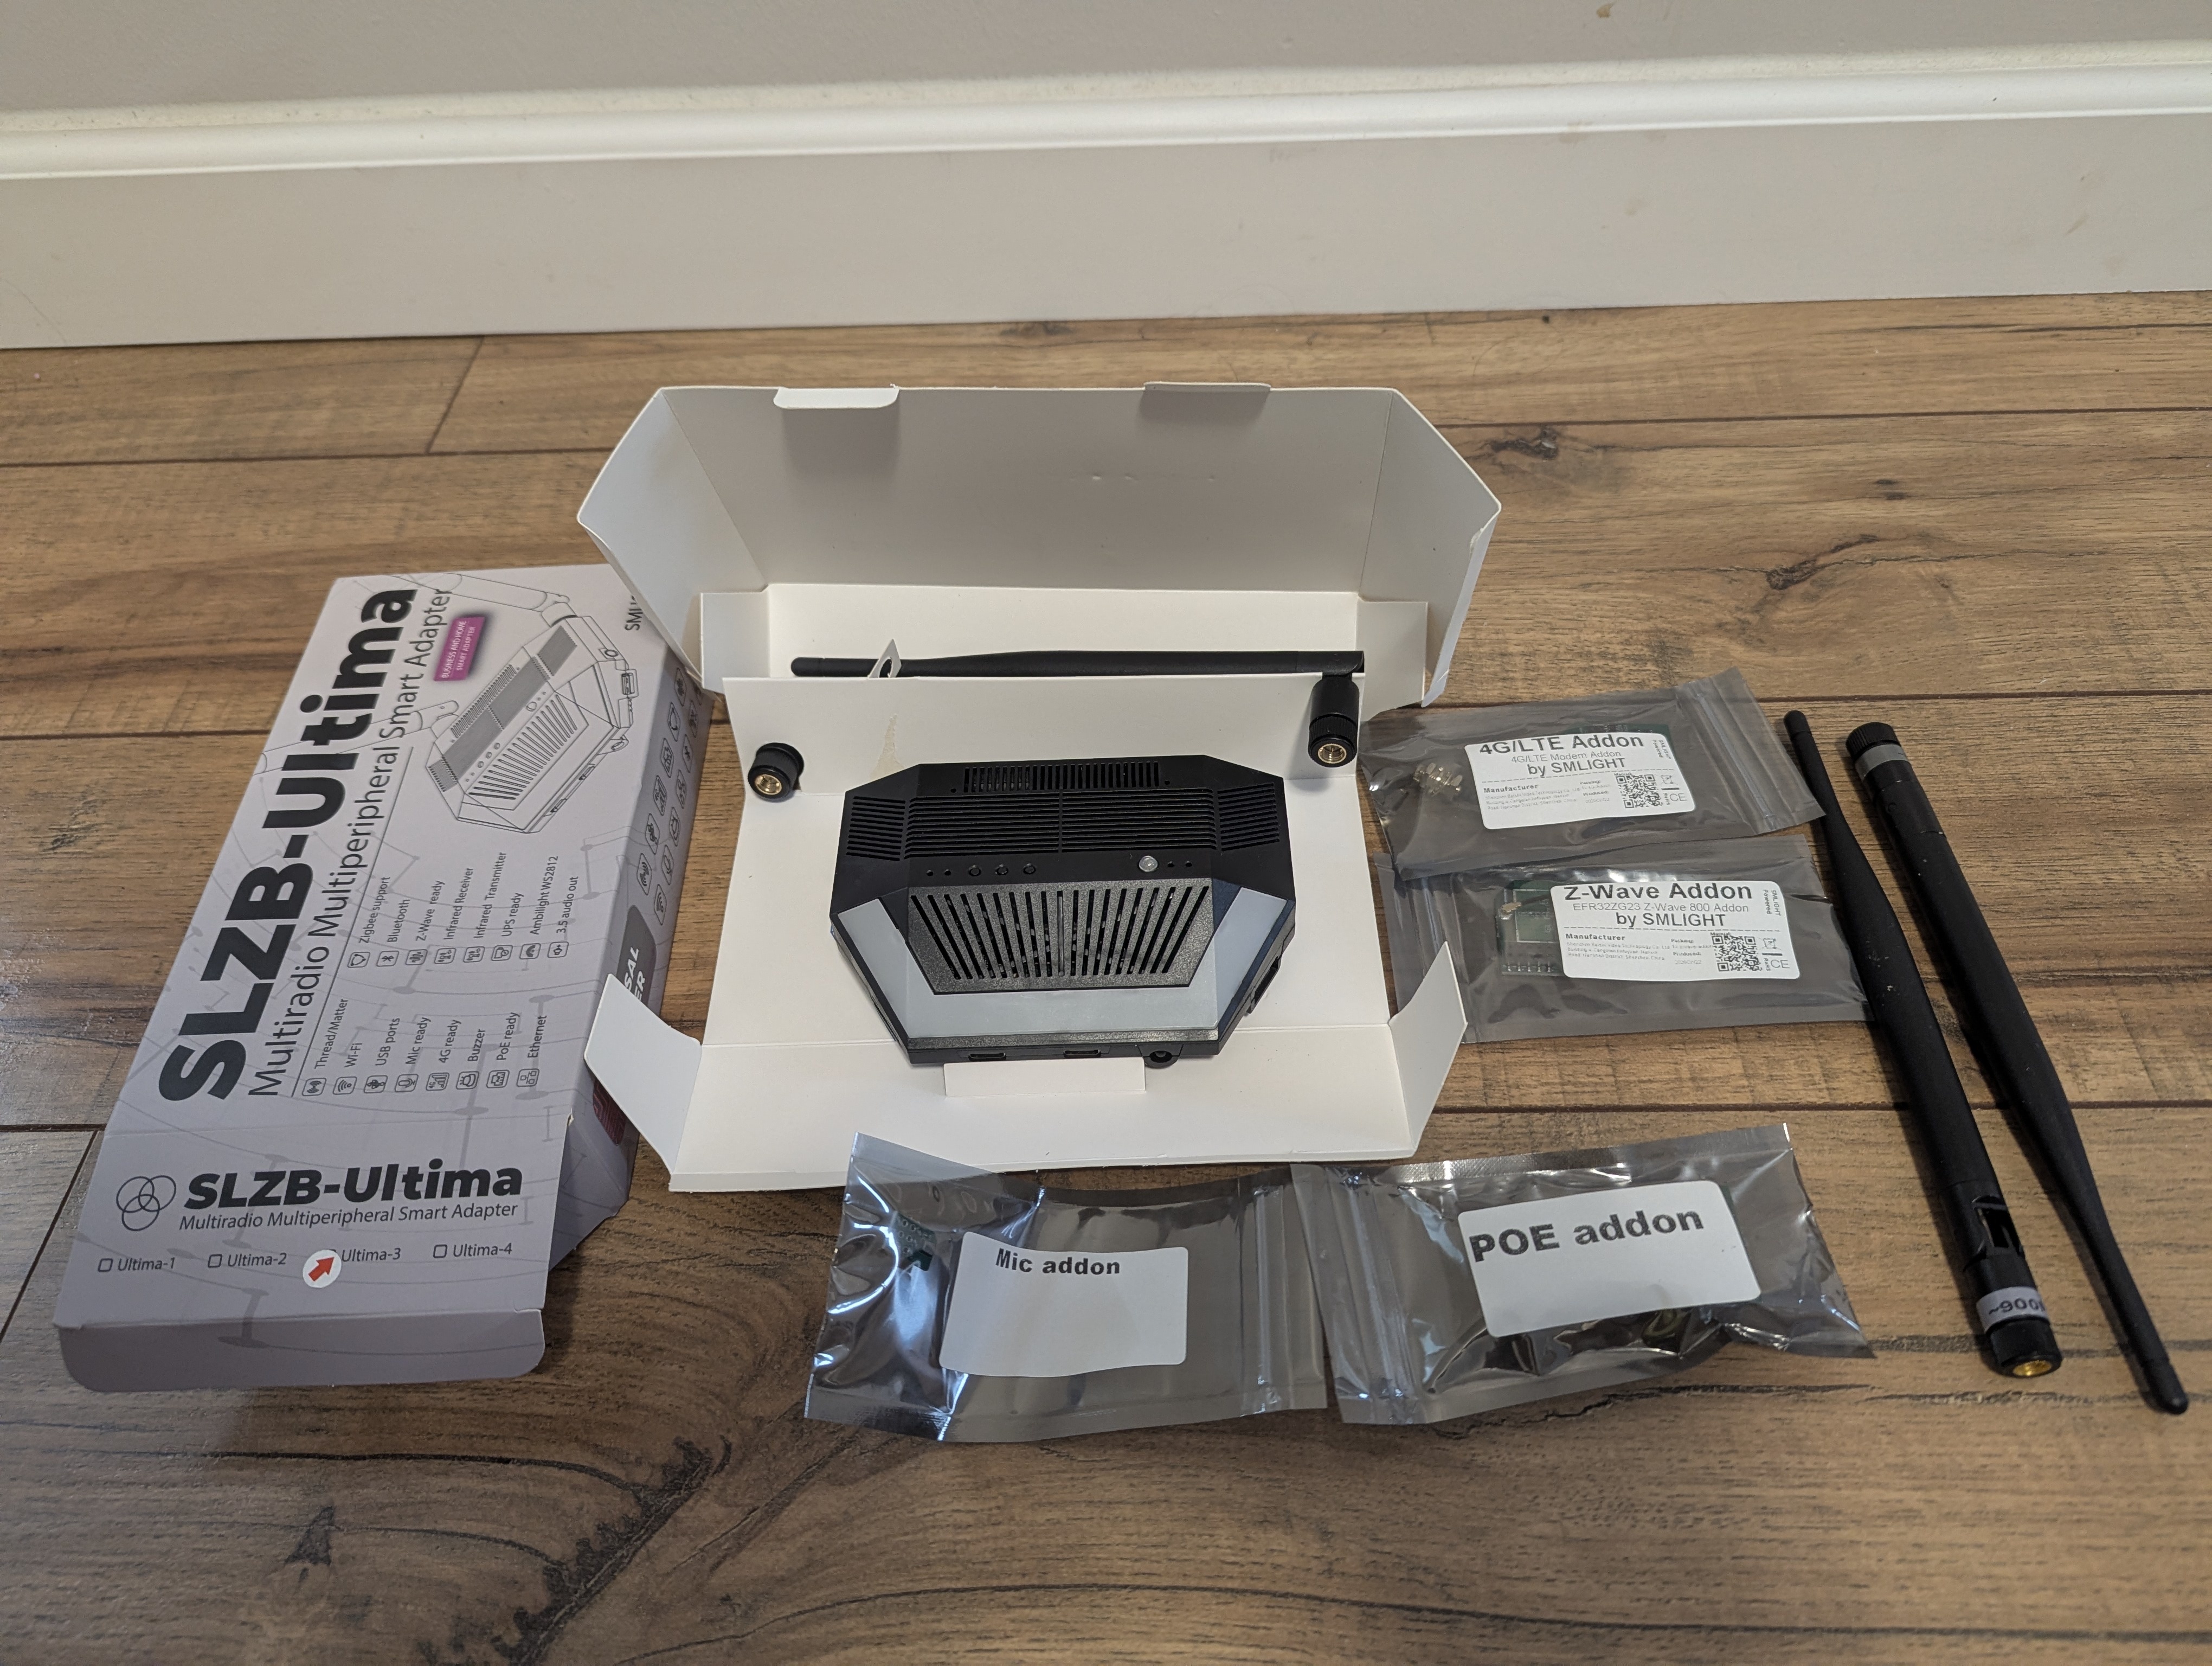
The SMLIGHT SLZB-Ultima-3 arrives in a sleek industrial package that immediately signals its professional-grade ambition. Unboxing the device reveals the primary gateway enclosure, multiple high-gain external antennas, and mounting hardware designed for easy placement in your home or networking closet.
Exterior Aesthetics & I/O Profile
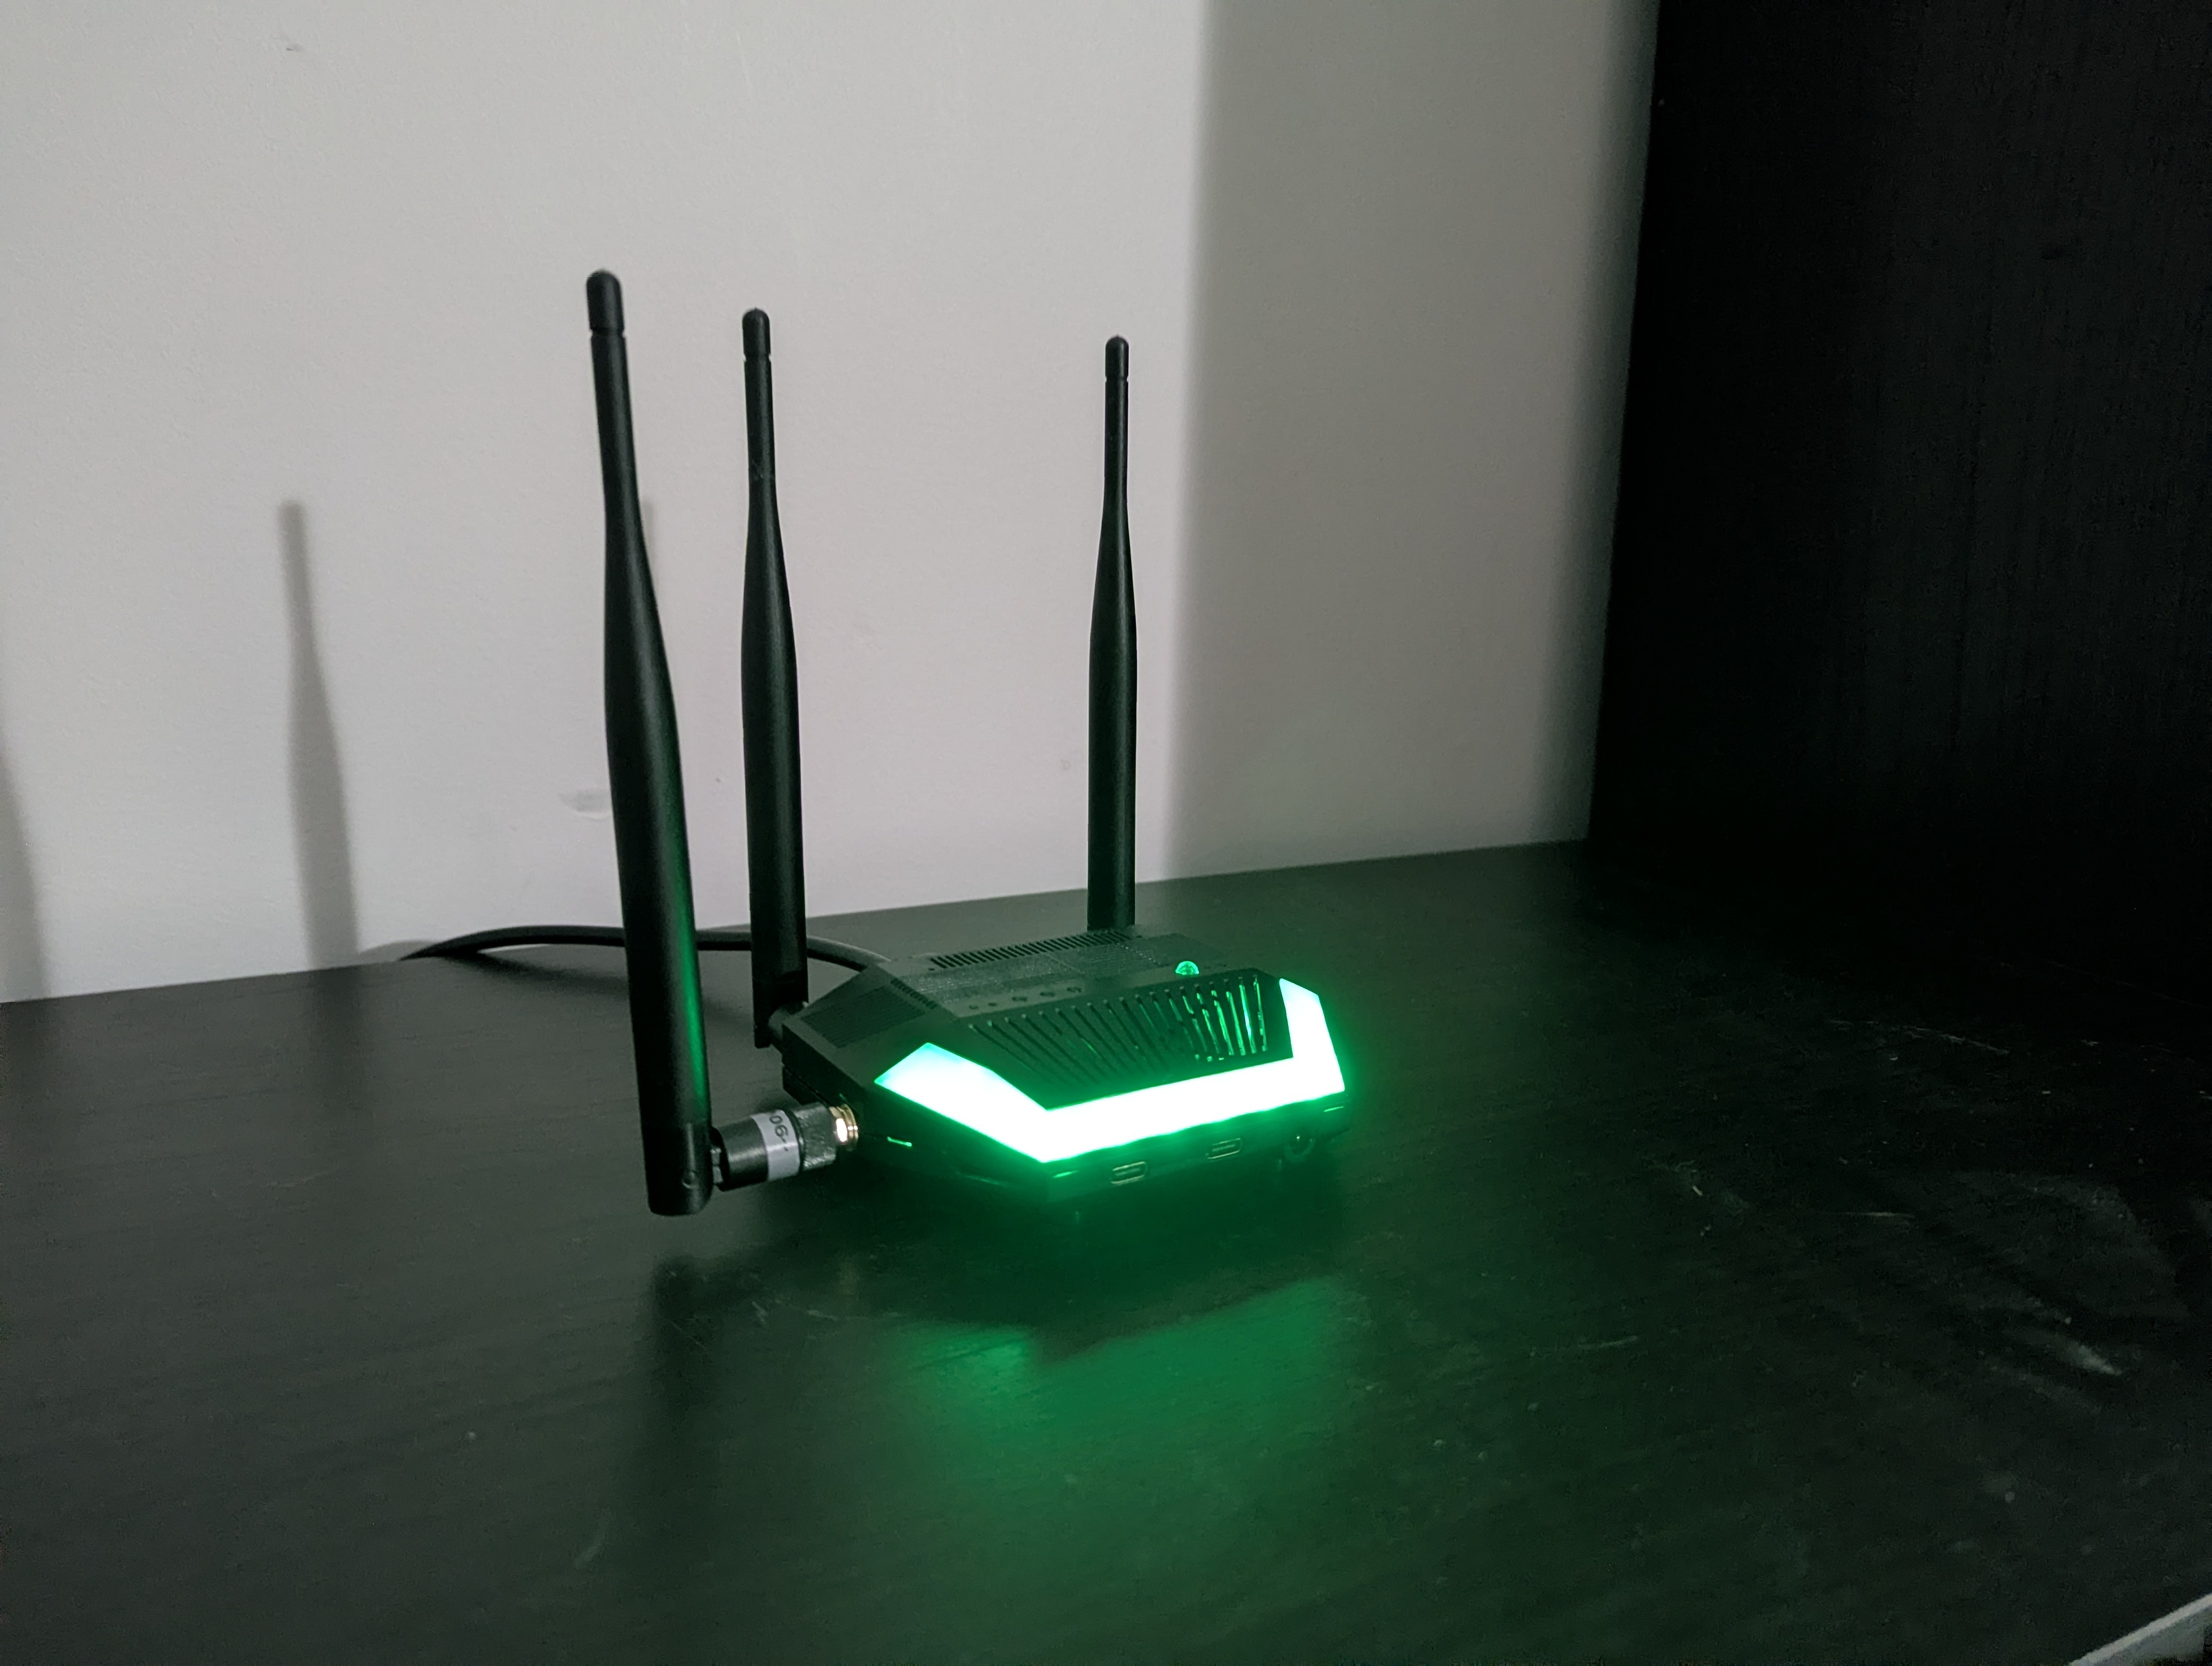
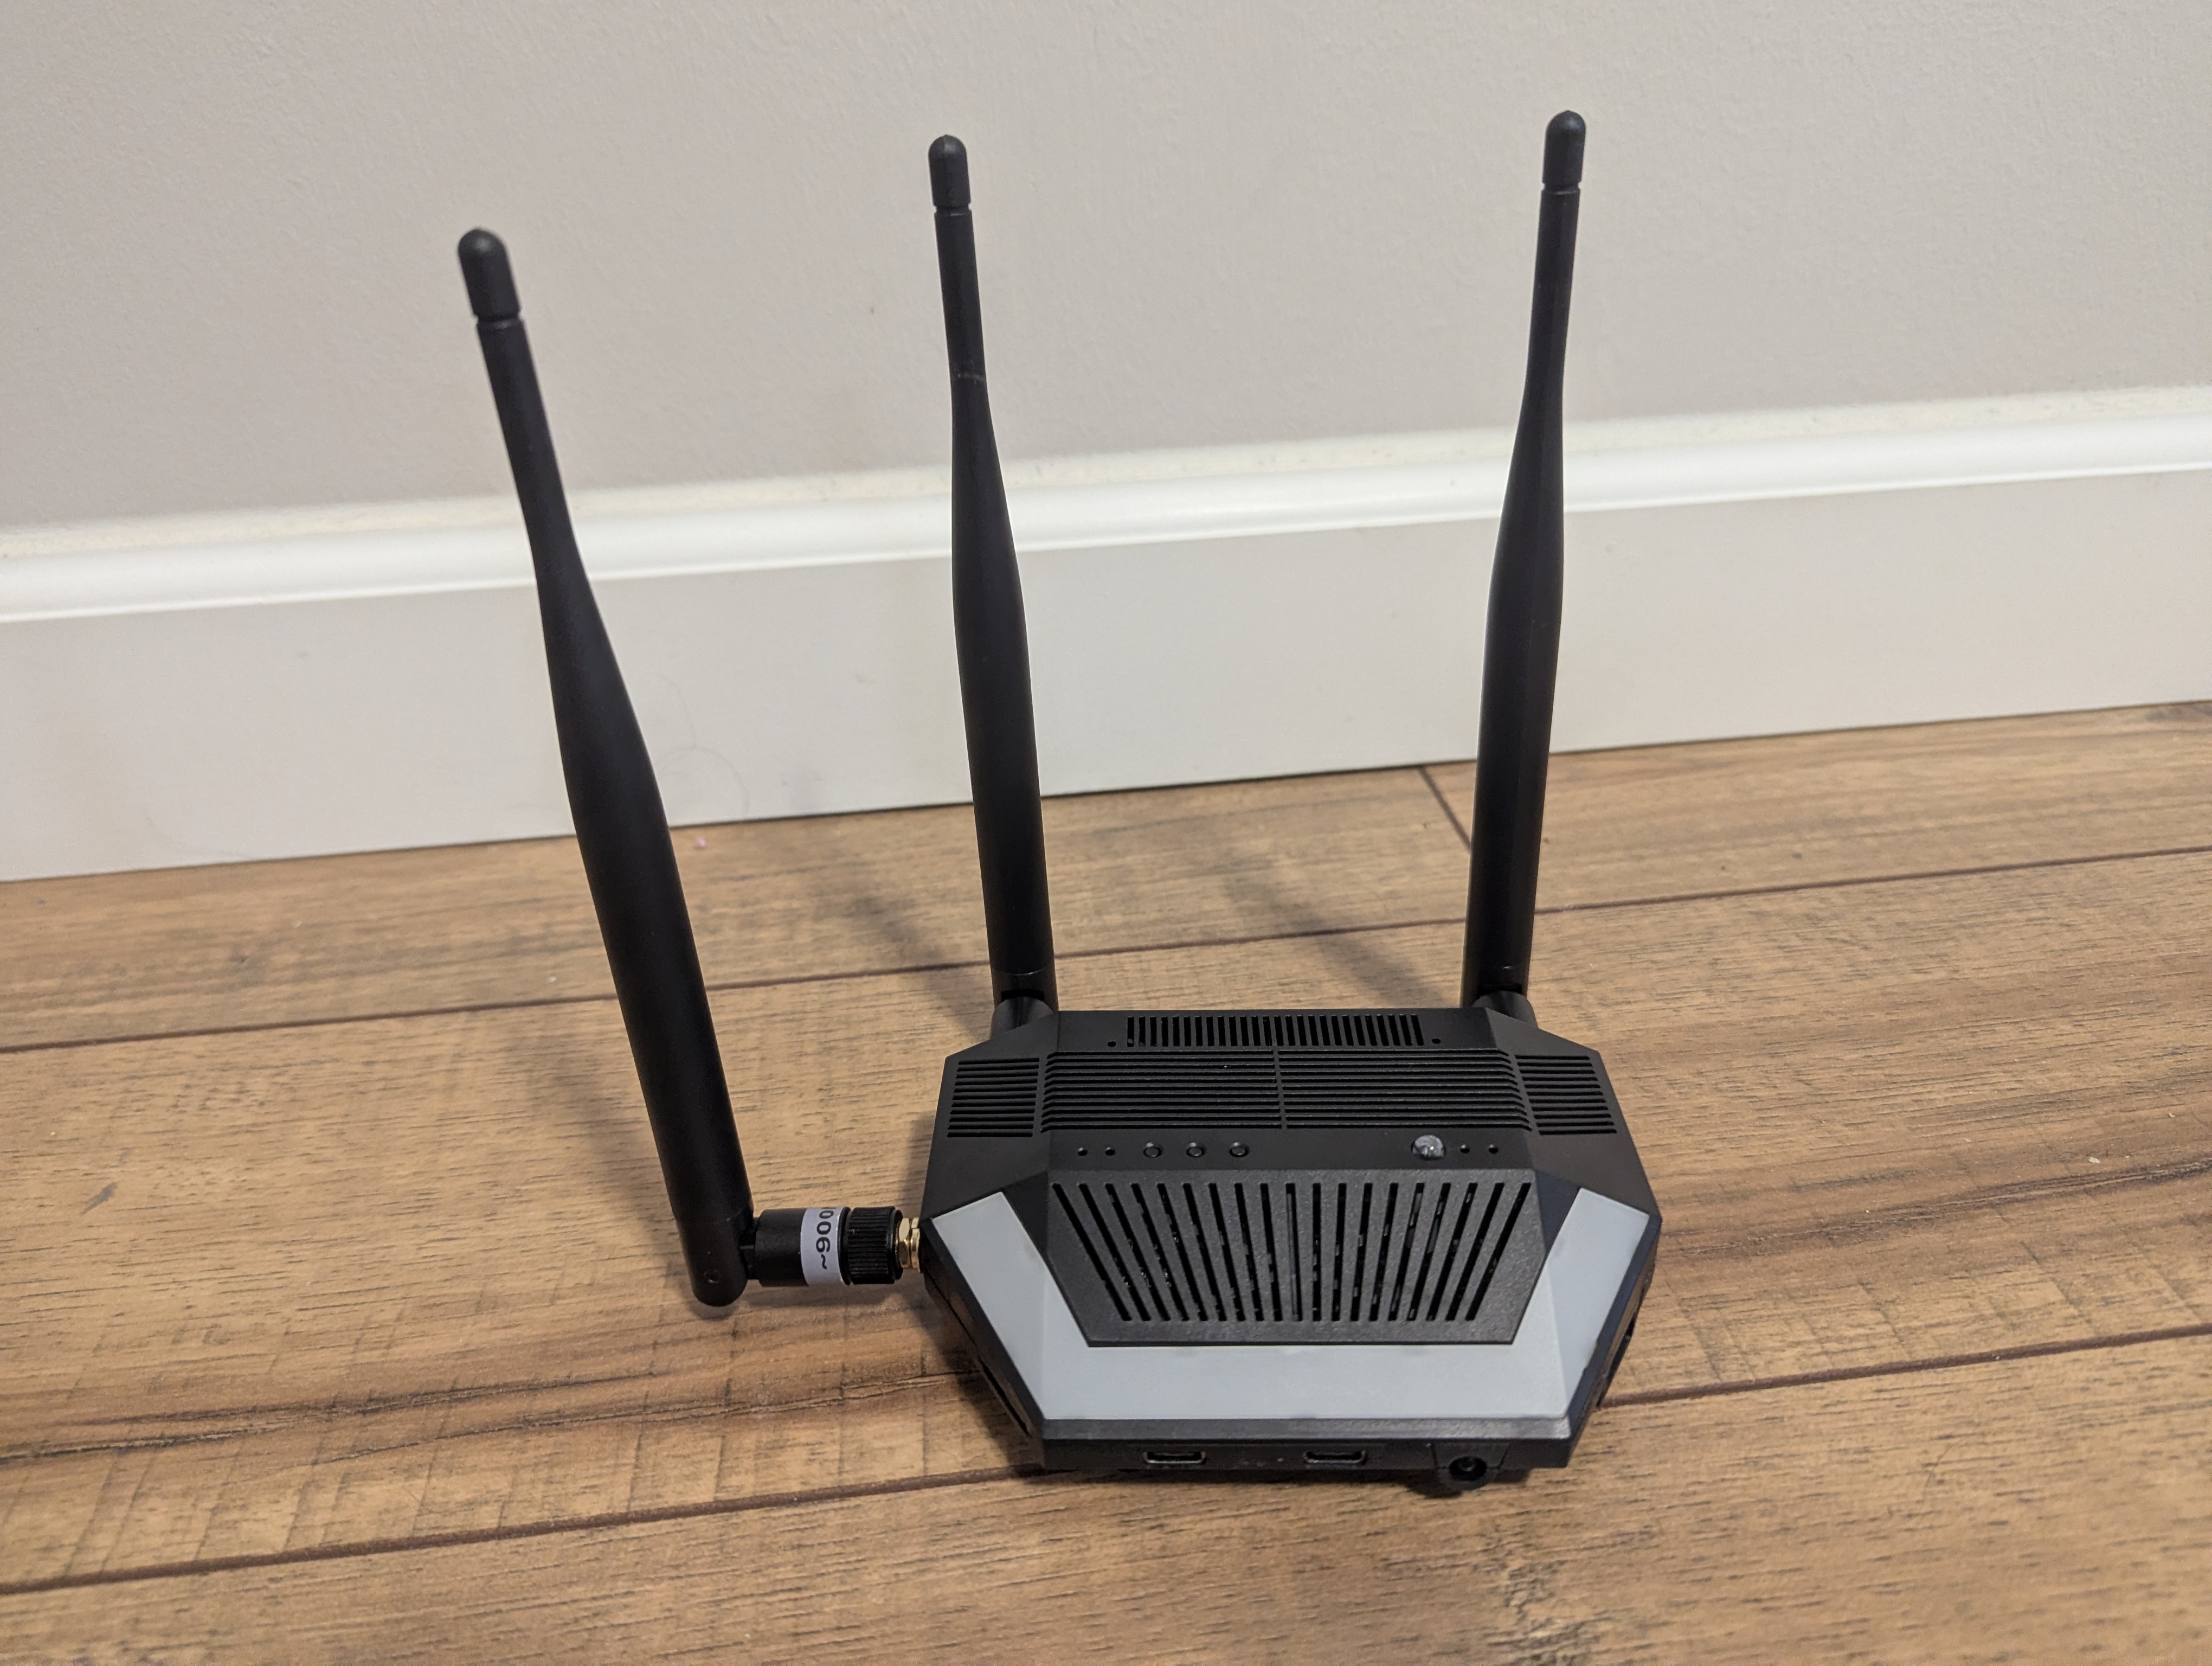
Looking at the front profile (front-view.jpg), the faceplate features a clean, translucent window housing the internal Infrared (IR) Receiver and Transmitter alongside multi-color WS2812B RGB status LEDs that provide instant visual feedback on system boot, PoE connectivity, and active Zigbee/Z-Wave radio pairing.
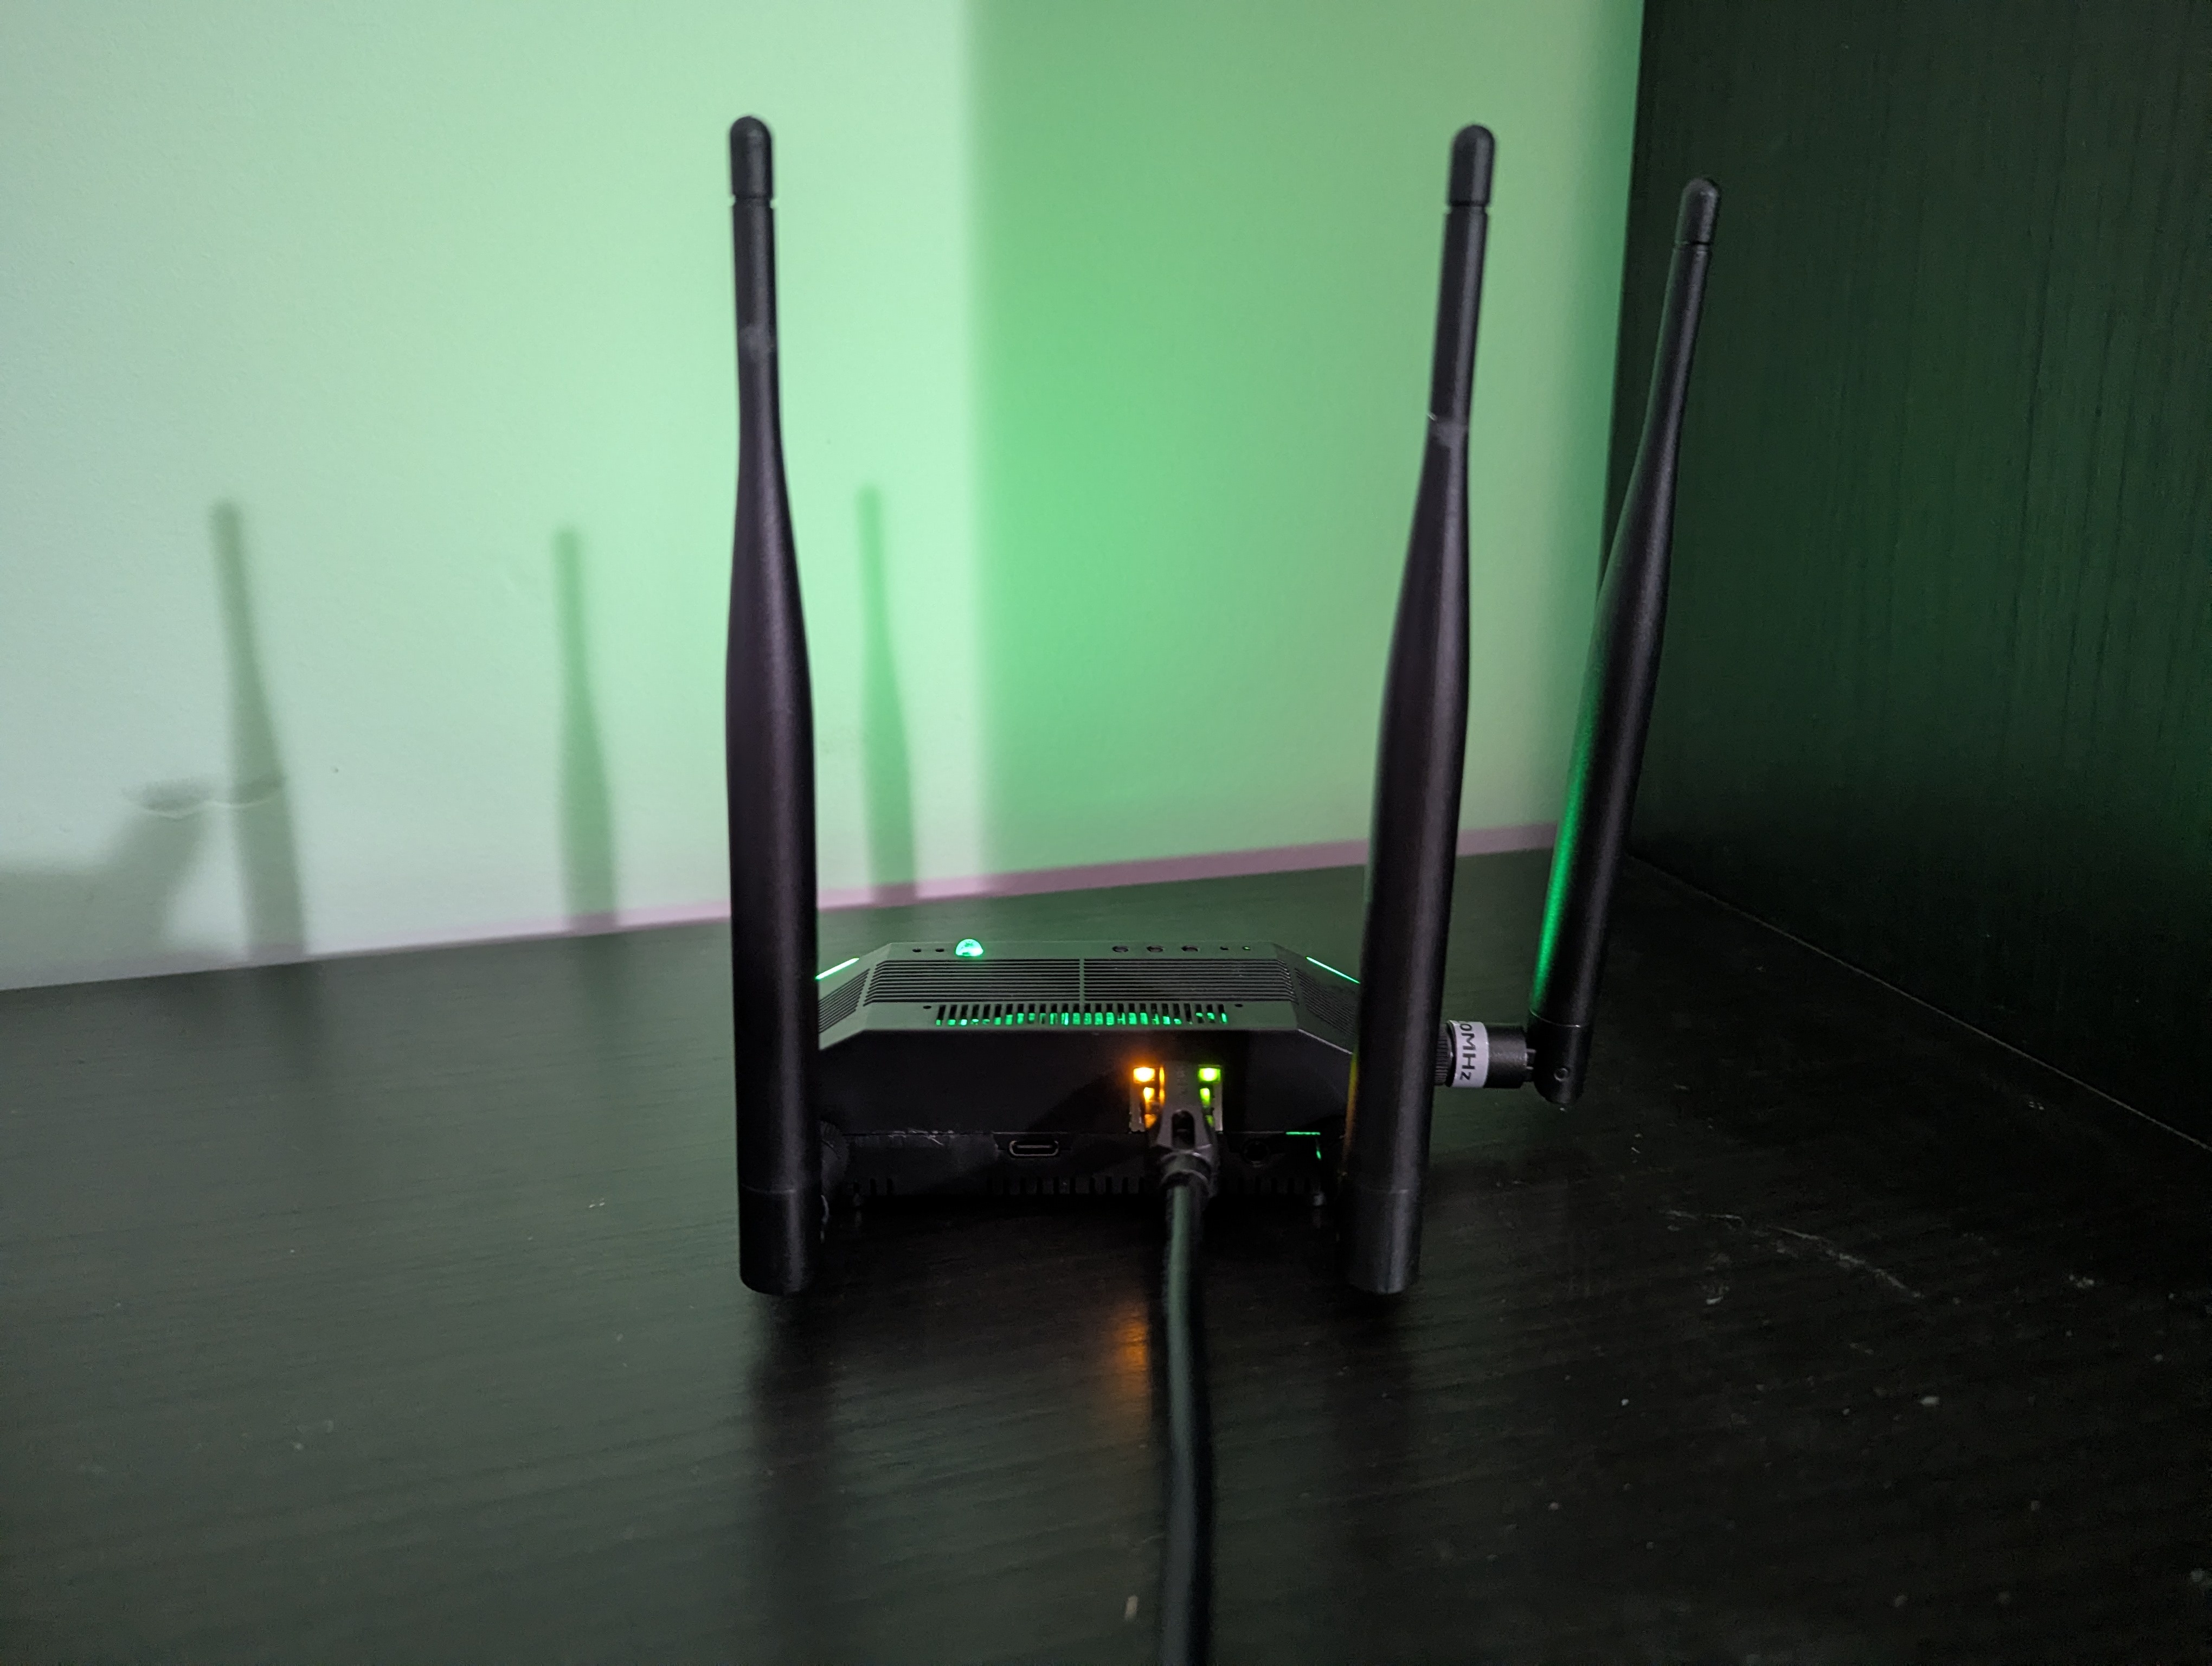
Turning to the back profile (back-view.jpg), you will find the 100Mbps Ethernet port (with PoE 802.3af support) alongside a USB Type-C port for optional bus powering, initial serial console debugging, or secondary network tethering.
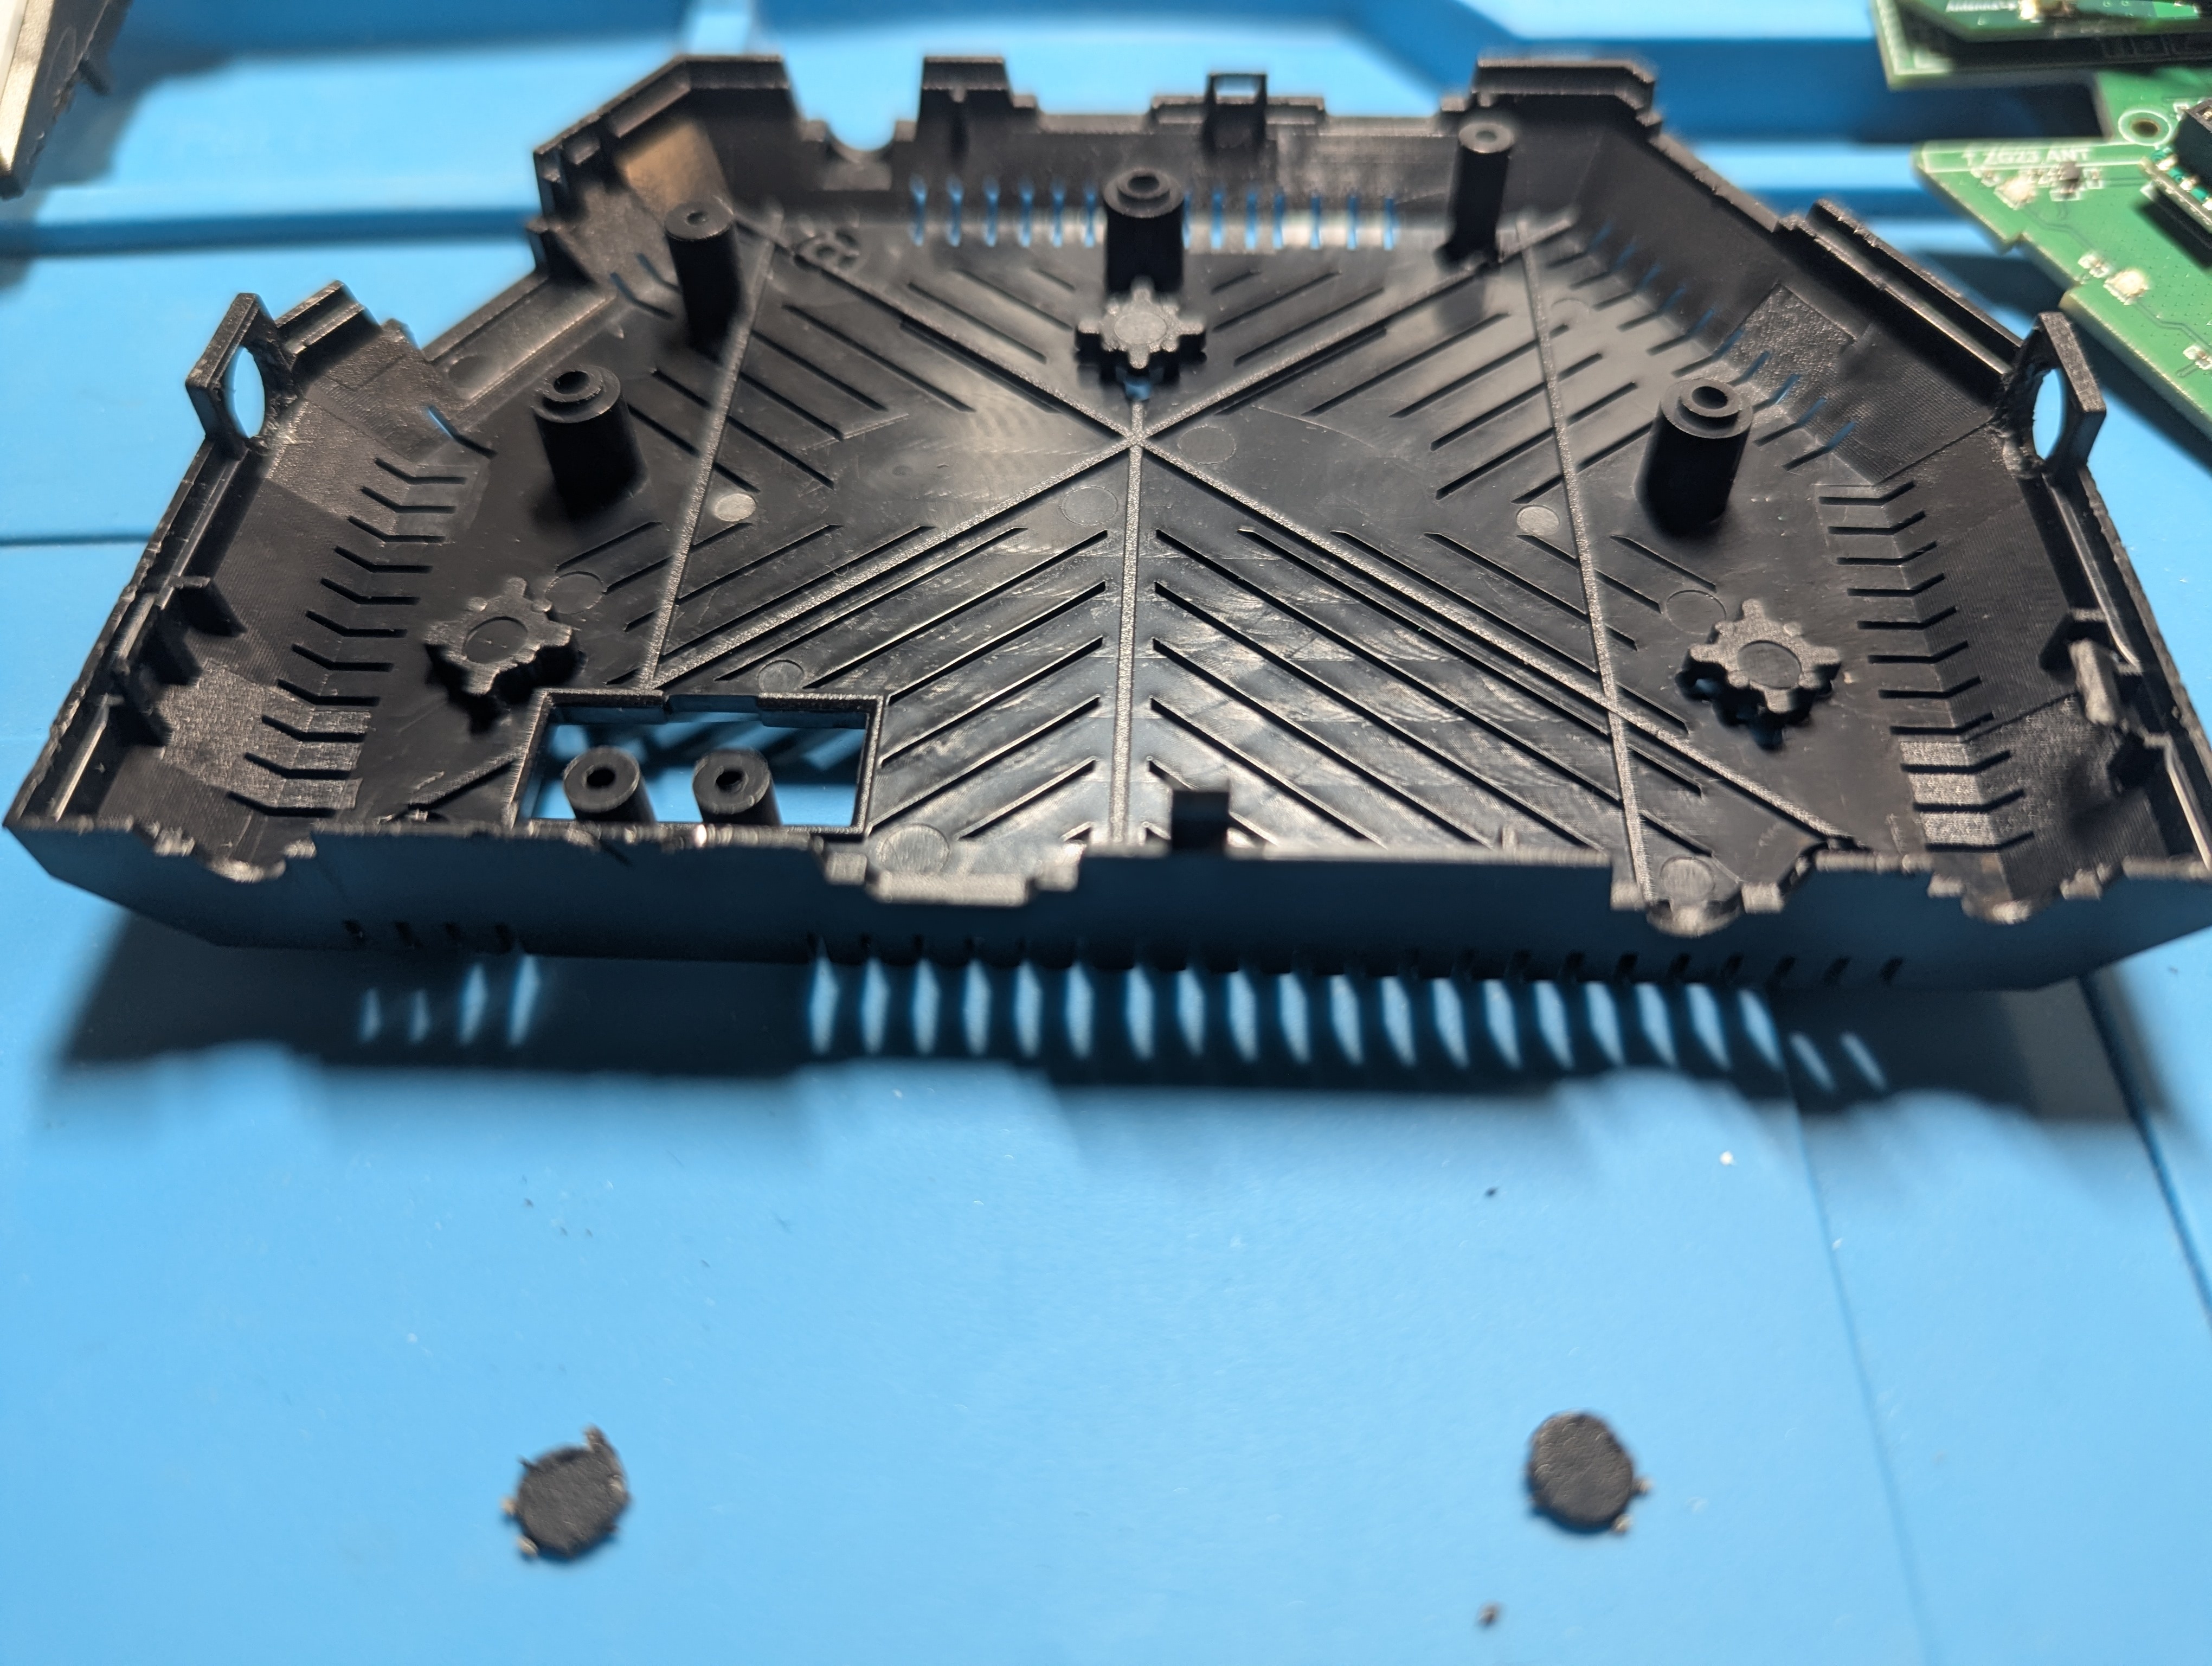
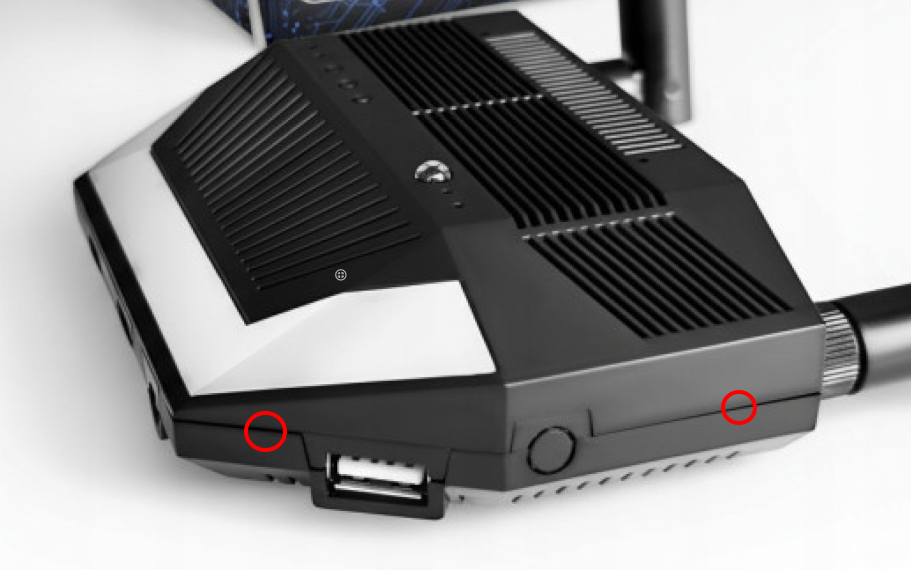
The top and side views (upside-view.jpg and side-antenna-knock-out.jpg) highlight the heavy-duty ventilation slits and SMA antenna connectors. Notice the pre-molded side antenna knockouts—these tabs can be cleanly pushed out to accommodate additional high-gain antennas when stacking secondary co-processor boards or custom RF modules.
Core Multi-SoC Architecture
At the heart of the SLZB-Ultima-3 is a triple-processor architecture engineered specifically for protocol concurrency. Unlike typical single-radio coordinators where flashing Thread/Matter forces you to give up your Zigbee mesh, the Ultima-3 runs three distinct processors and radios directly on the baseboard:
- Core Engine (Network Backbone): Espressif ESP32-S3 Acts as the primary system supervisor, handling 100Mbps Ethernet bridging, Wi-Fi 2.4GHz fallback, Bluetooth Low Energy (BLE Proxy), and hosting the responsive SLZB-OS web interface.
- Radio 1: Silicon Labs EFR32MG24
A high-performance ARM Cortex-M33 wireless SoC pre-flashed with Zigbee 3.0 Coordinator firmware (
20250212), capable of supporting hundreds of direct and meshed Zigbee nodes with ultra-low latency. - Radio 2: Texas Instruments CC2674P10
A secondary ultra-low-power wireless MCU (
20260311) that can run either a parallel Zigbee network (such as isolating noisy outdoor sensors from your indoor lighting) or act as an independent OpenThread Border Router for Matter over Thread devices.
Multi-Radio Concurrency Strategies
Having two distinct high-end wireless MCUs right on the mainboard opens up powerful deployment strategies:
- Strategy 1 (Split-Mesh Isolation): Dedicate Radio 1 (
EFR32MG24) to your high-priority indoor lighting, switches, and security sensors. Meanwhile, configure Radio 2 (CC2674P10) as an isolated secondary Zigbee network dedicated solely to chatty or distant outdoor garden sensors, guaranteeing that weak outdoor signals never degrade your indoor mesh response times. - Strategy 2 (Zigbee + Matter/Thread Concurrency): Run your primary Zigbee 3.0 mesh on Radio 1 (
EFR32MG24) while reserving Radio 2 (CC2674P10) exclusively as an independent OpenThread Border Router for local Matter over Thread devices—all driven simultaneously by a single ethernet gateway.
How to Safely Open the Case
To access the internal header pins or install/swap modular add-on boards, you must carefully open the snap-fit enclosure. Because the SLZB-Ultima-3 uses tightly engineered internal plastic snaps along its side walls, following the proper opening technique ensures you don't break the clips or stress internal surface components.
[!IMPORTANT] Tool Requirement: Prepare a thin, flat plastic prying tool or spudger (a small flathead screwdriver can also be used if wrapped in tape to prevent scratching the finish).
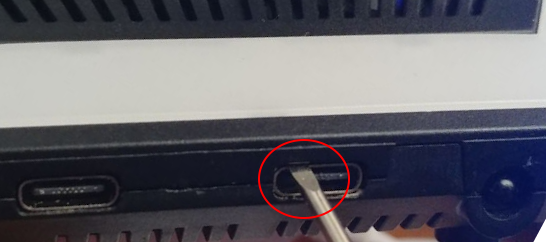
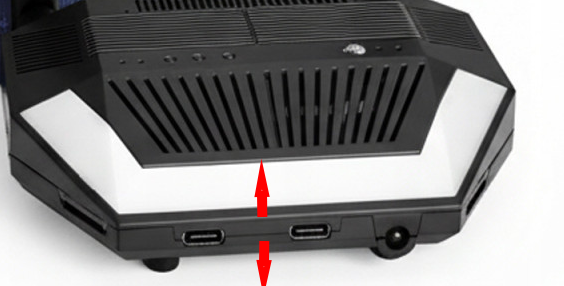
Step 1: Insert the Tool at the Rear Seam
Insert your thin prying tool from above directly into the seam between the USB Type-C port metal shell and the top case cover.
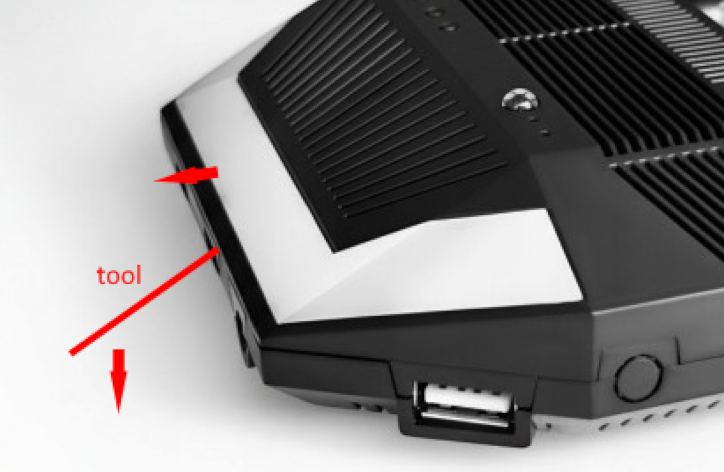
Step 2: Lever the Top Cover Forward
Carefully lever the tool forward while gently resting against the solid Type-C metal shroud. This creates an even upward lifting force that pops the rear lip of the top cover without putting tension on the side locking tabs.
Step 3: Separate Top and Bottom Covers
Once the rear lip is released, carefully pull apart the top and bottom covers evenly. Avoid twisting or jerking from one corner, as the internal snaps are distributed symmetrically.
Snap Clip Locations
Before opening or closing, familiarize yourself with the exact locations of the internal locking snaps so you apply pressure only where needed when snapping the housing back together:
Modular Add-on Header & Expansion Modules
Once the lid is removed, what truly separates the Ultima series from standalone hubs becomes obvious: its modular expansion header system. My test unit is fully loaded with stacking expansion boards that connect via high-density pin headers right above the baseboard:
PoE Add-On Module (
poe-addon.jpg): Delivers clean 48V Power-over-Ethernet alongside 100Mbps data right through the Ethernet port, eliminating the need for separate USB power adapters.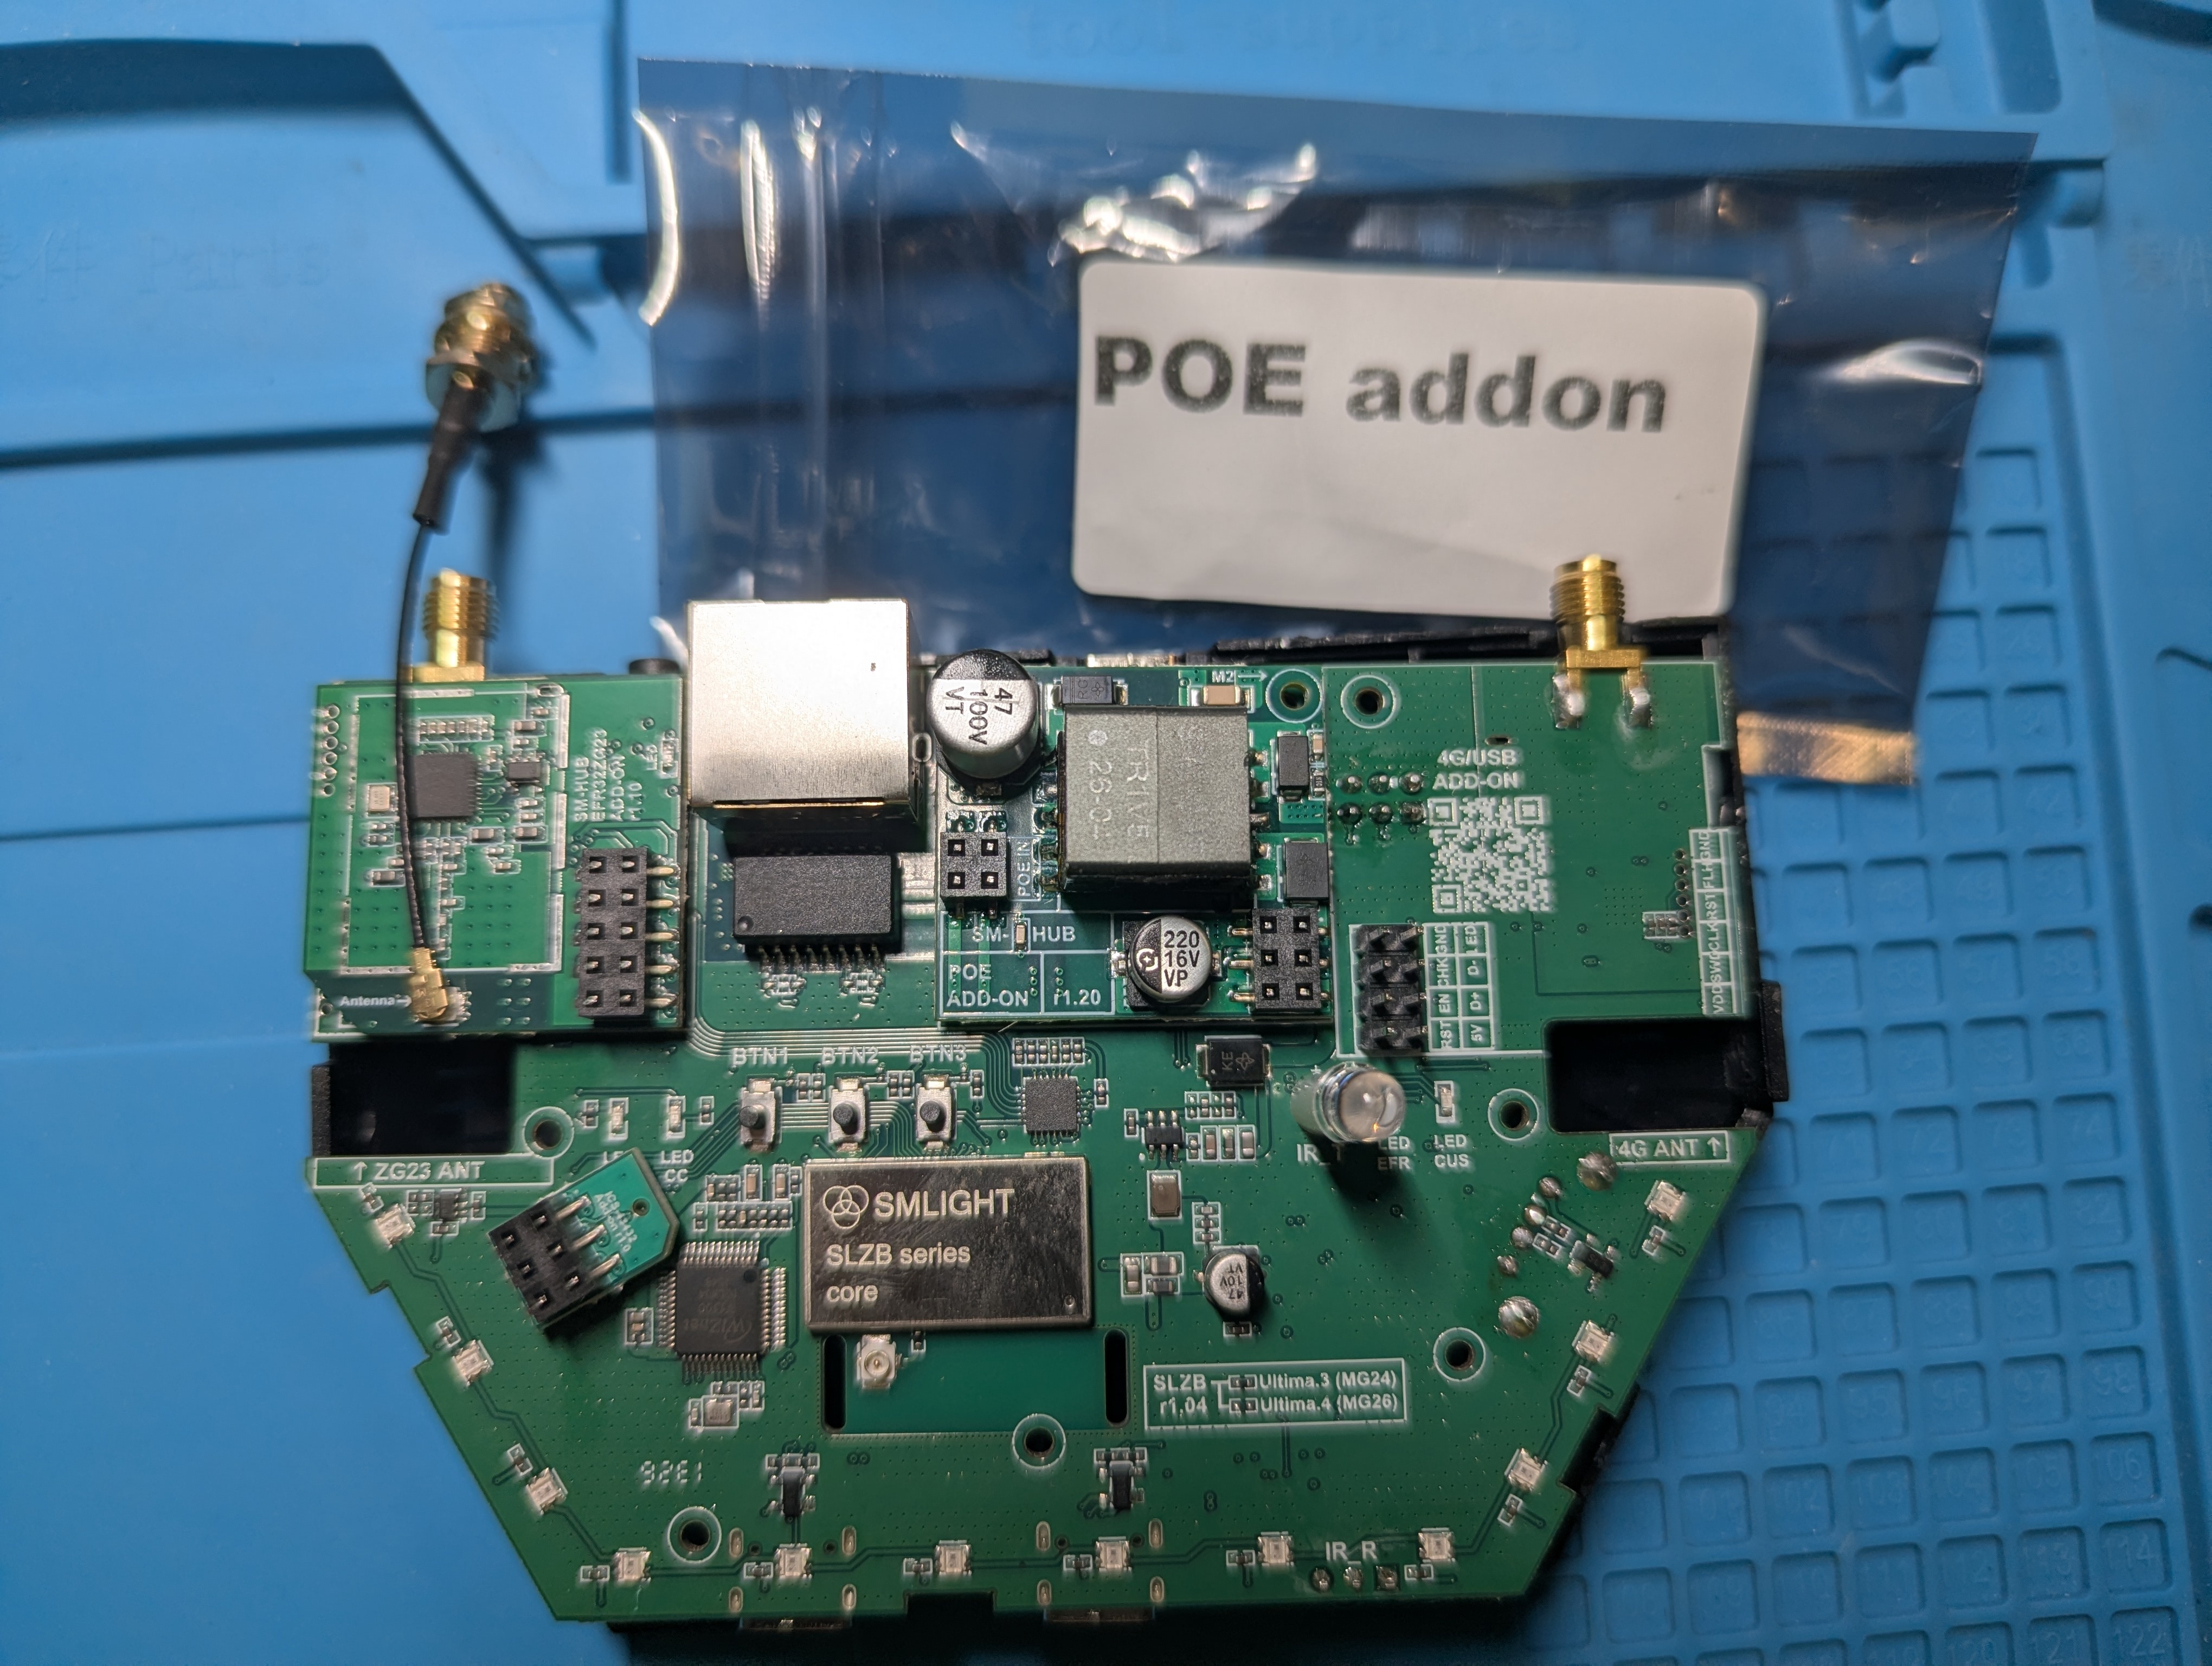
Z-Wave 800 Series Add-On (
zwave-addon.jpg): Powered by the latest Silicon Labs EFR32ZG23 chip, bringing Z-Wave Long Range (LR) controller capabilities with up to +14dBm TX output power and an incredible -106dBm RX sensitivity.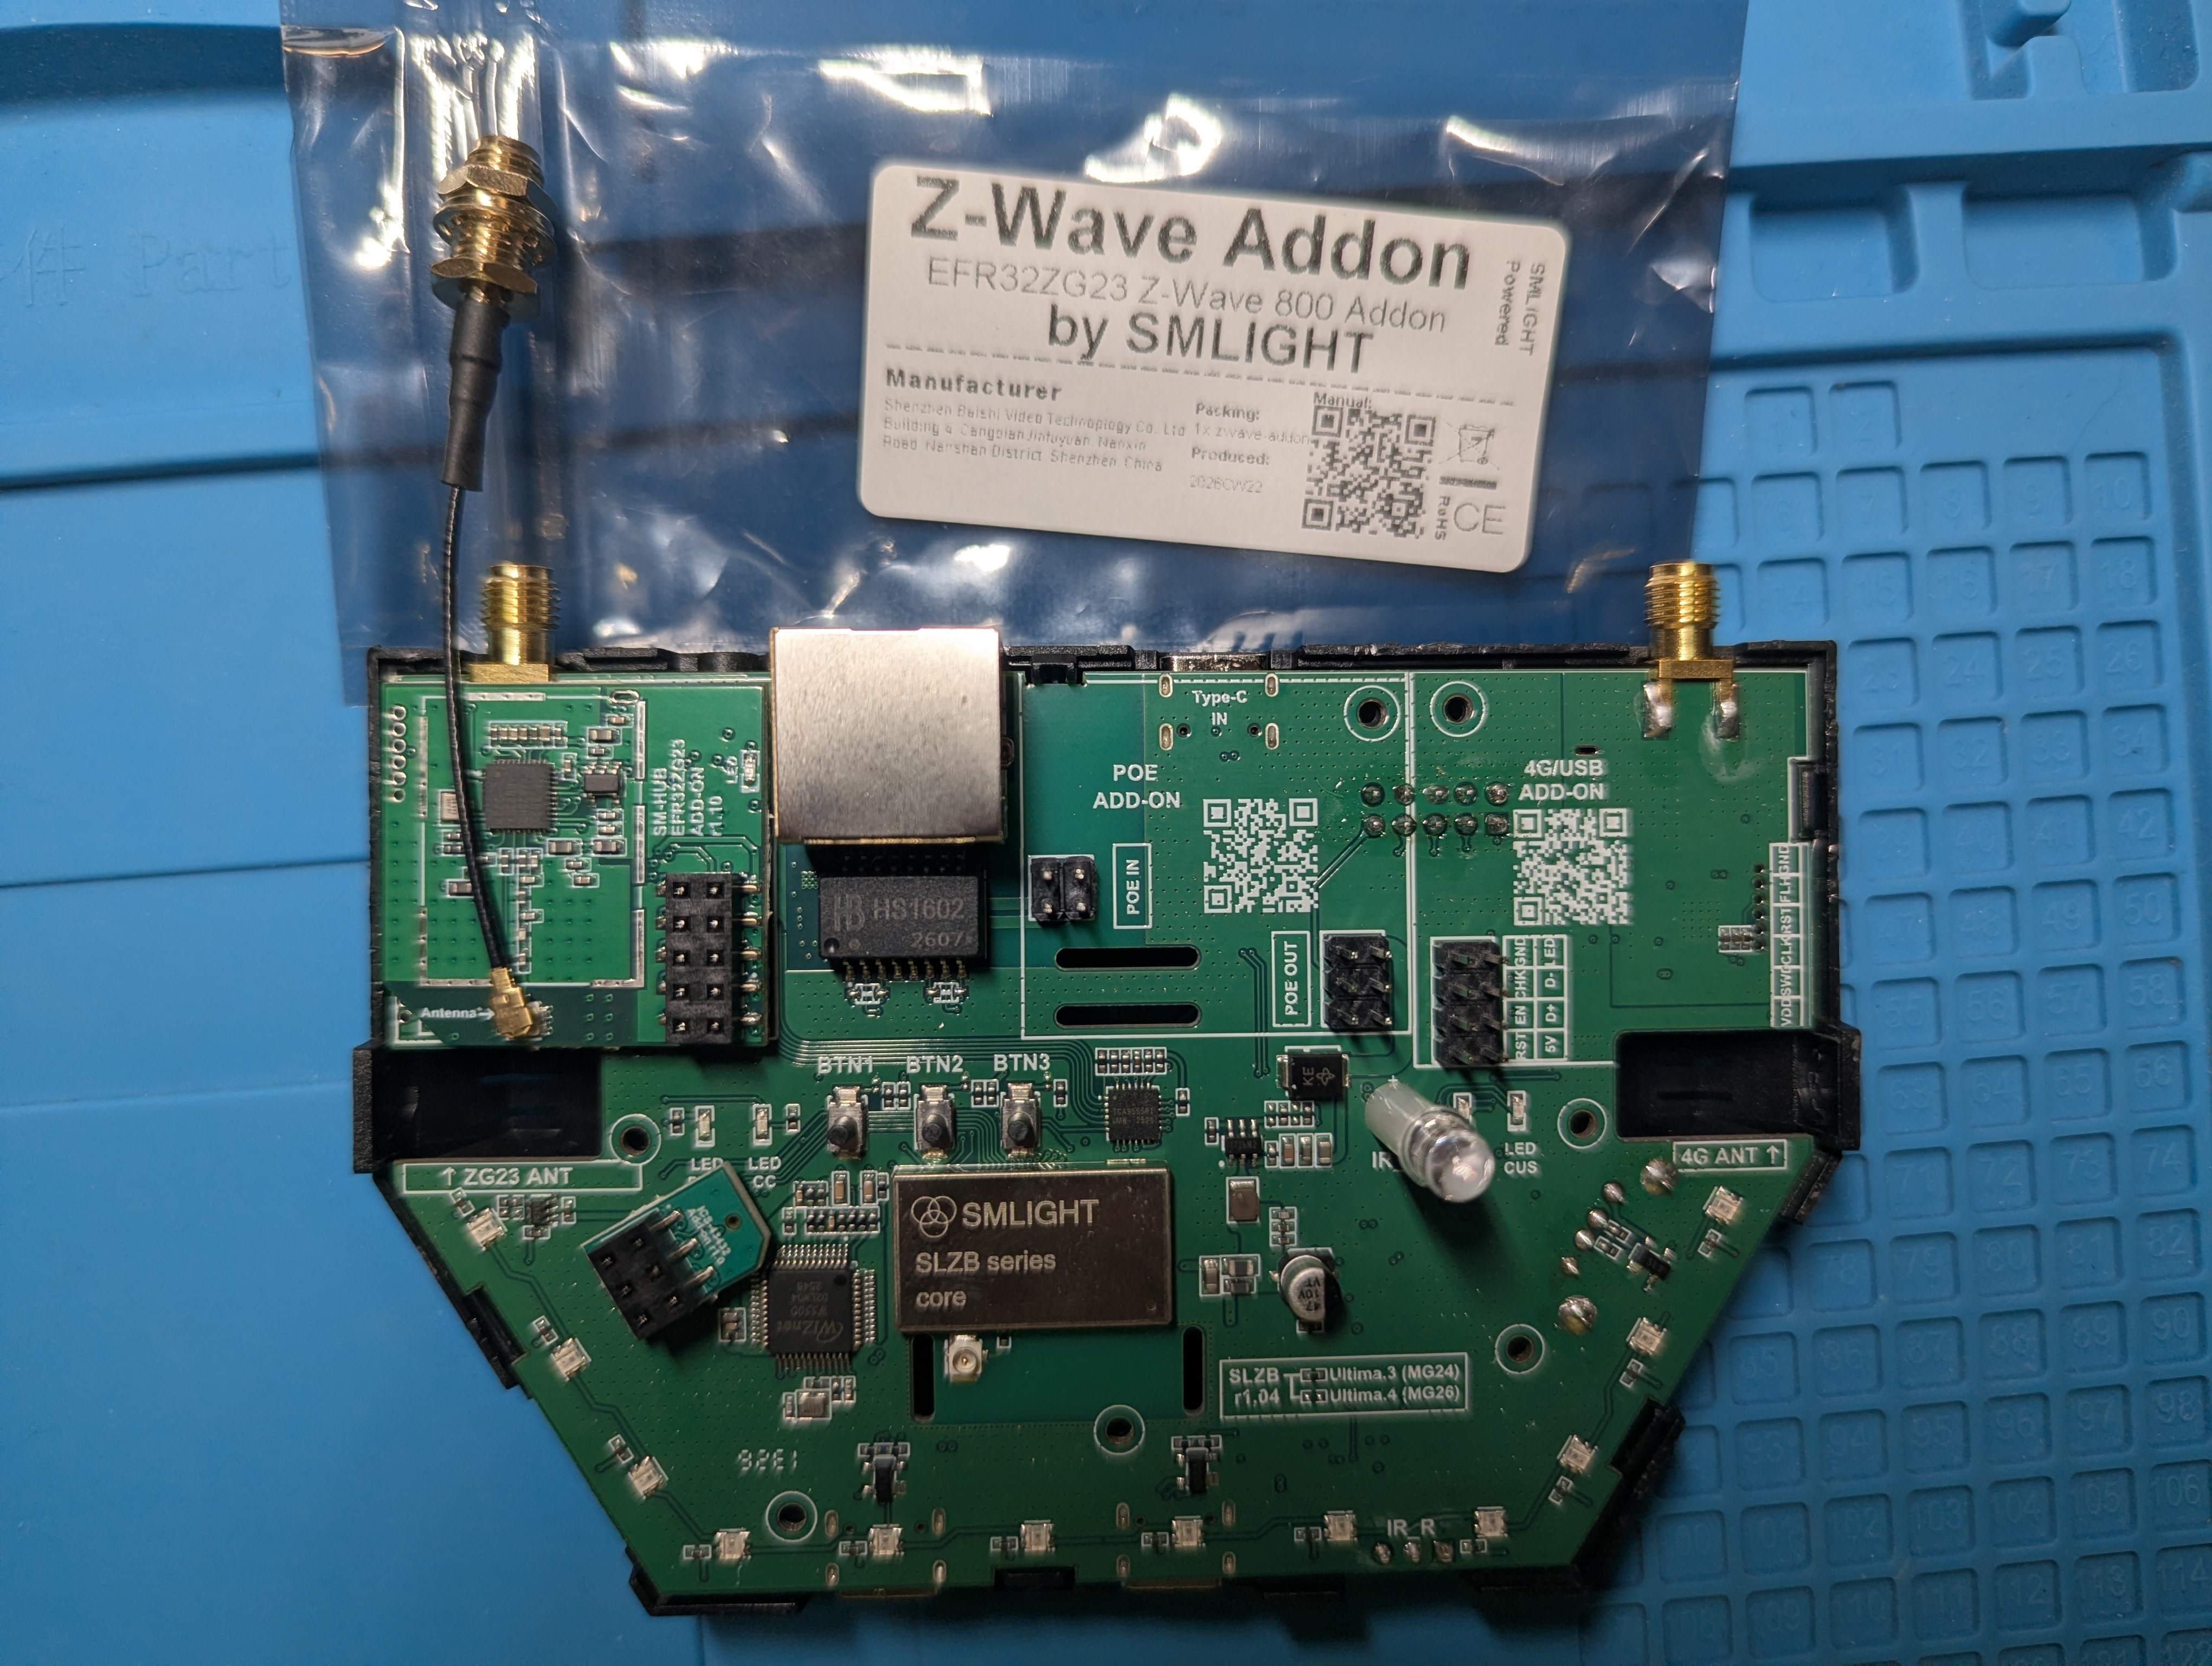
4G/LTE Add-On Module (
4g-LTE-addon.jpg): A cellular modem expansion slot designed for backup WAN failover or standalone off-grid SMS alerting.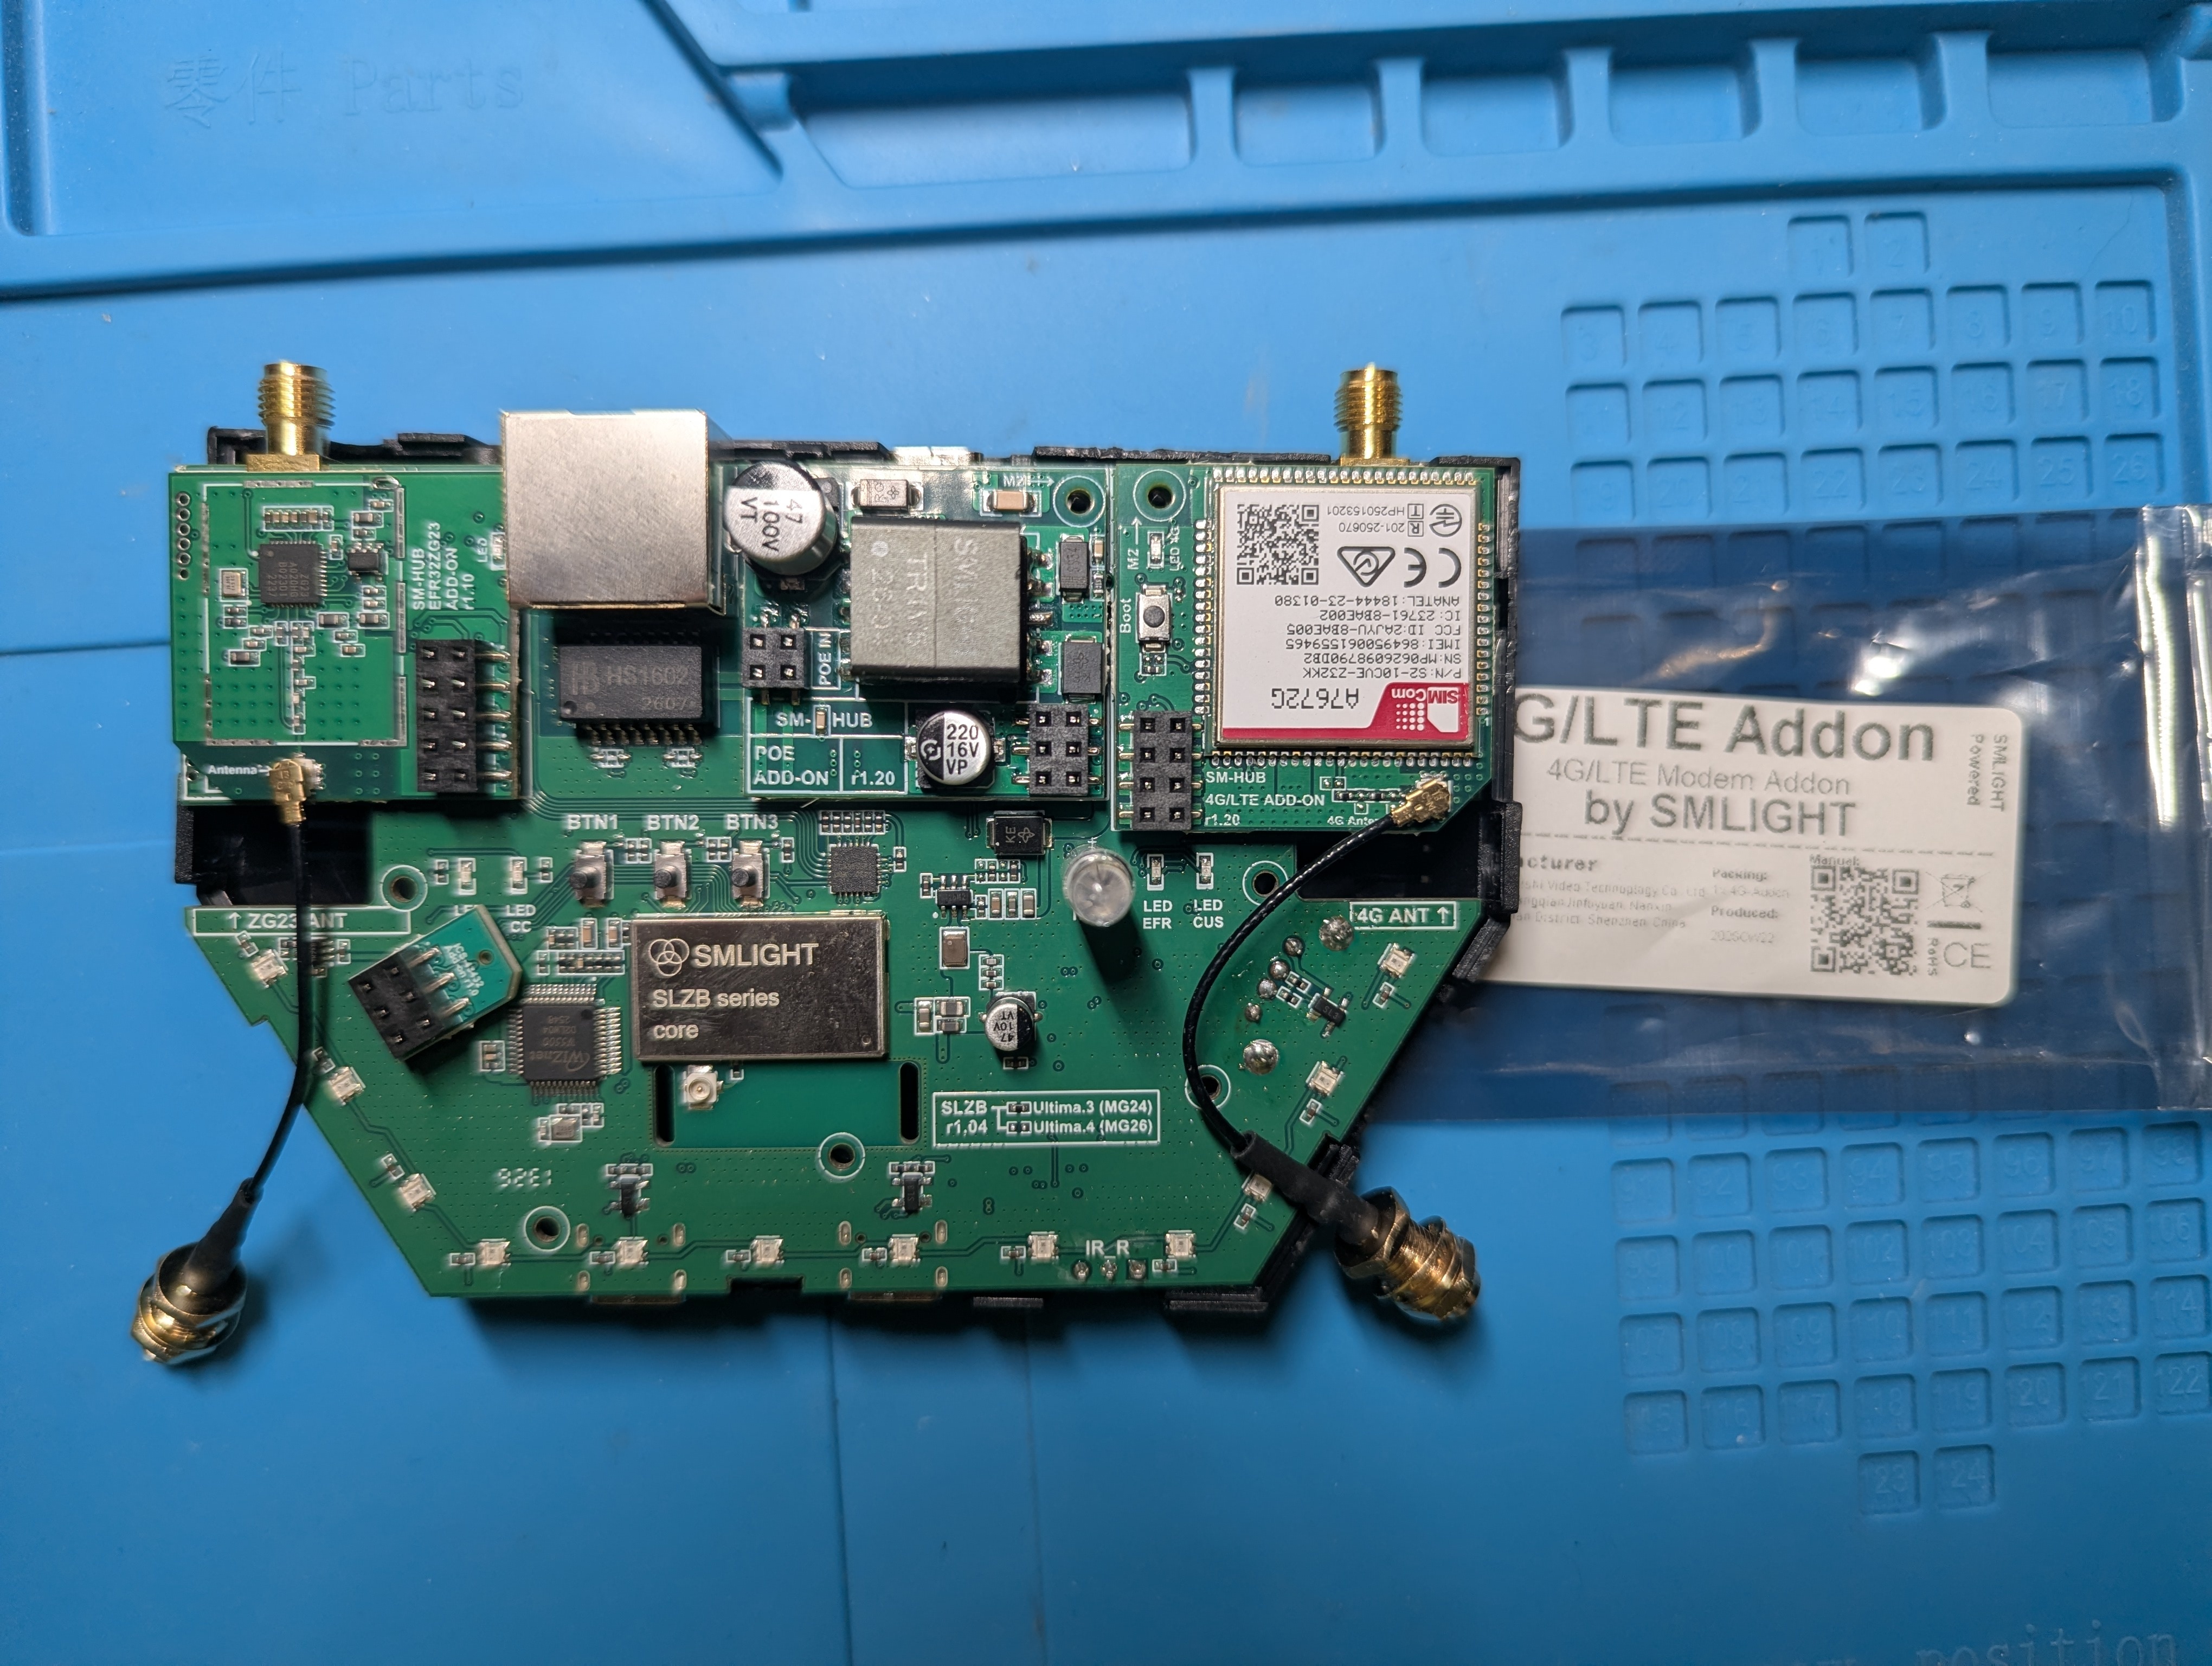
[!NOTE] Testing Scope Note: Because I currently do not have a spare 4G SIM card, I did not install the 4G/LTE add-on module or attach its external cellular antenna inside my active test gateway. My live testing and benchmarks in this review focus on the PoE powering, built-in dual Zigbee radios, and the Z-Wave 800 LR add-on.
Audio/Mic & Combo Modules (
mic-addon.jpg&zwave-addon-and-mic-addon.jpg): SMLIGHT also offers specialized acoustic add-ons like the microphone module and dual Z-Wave + Mic combo boards, opening up possibilities for localized voice assistant capabilities and sound/glass-break detection right on the gateway.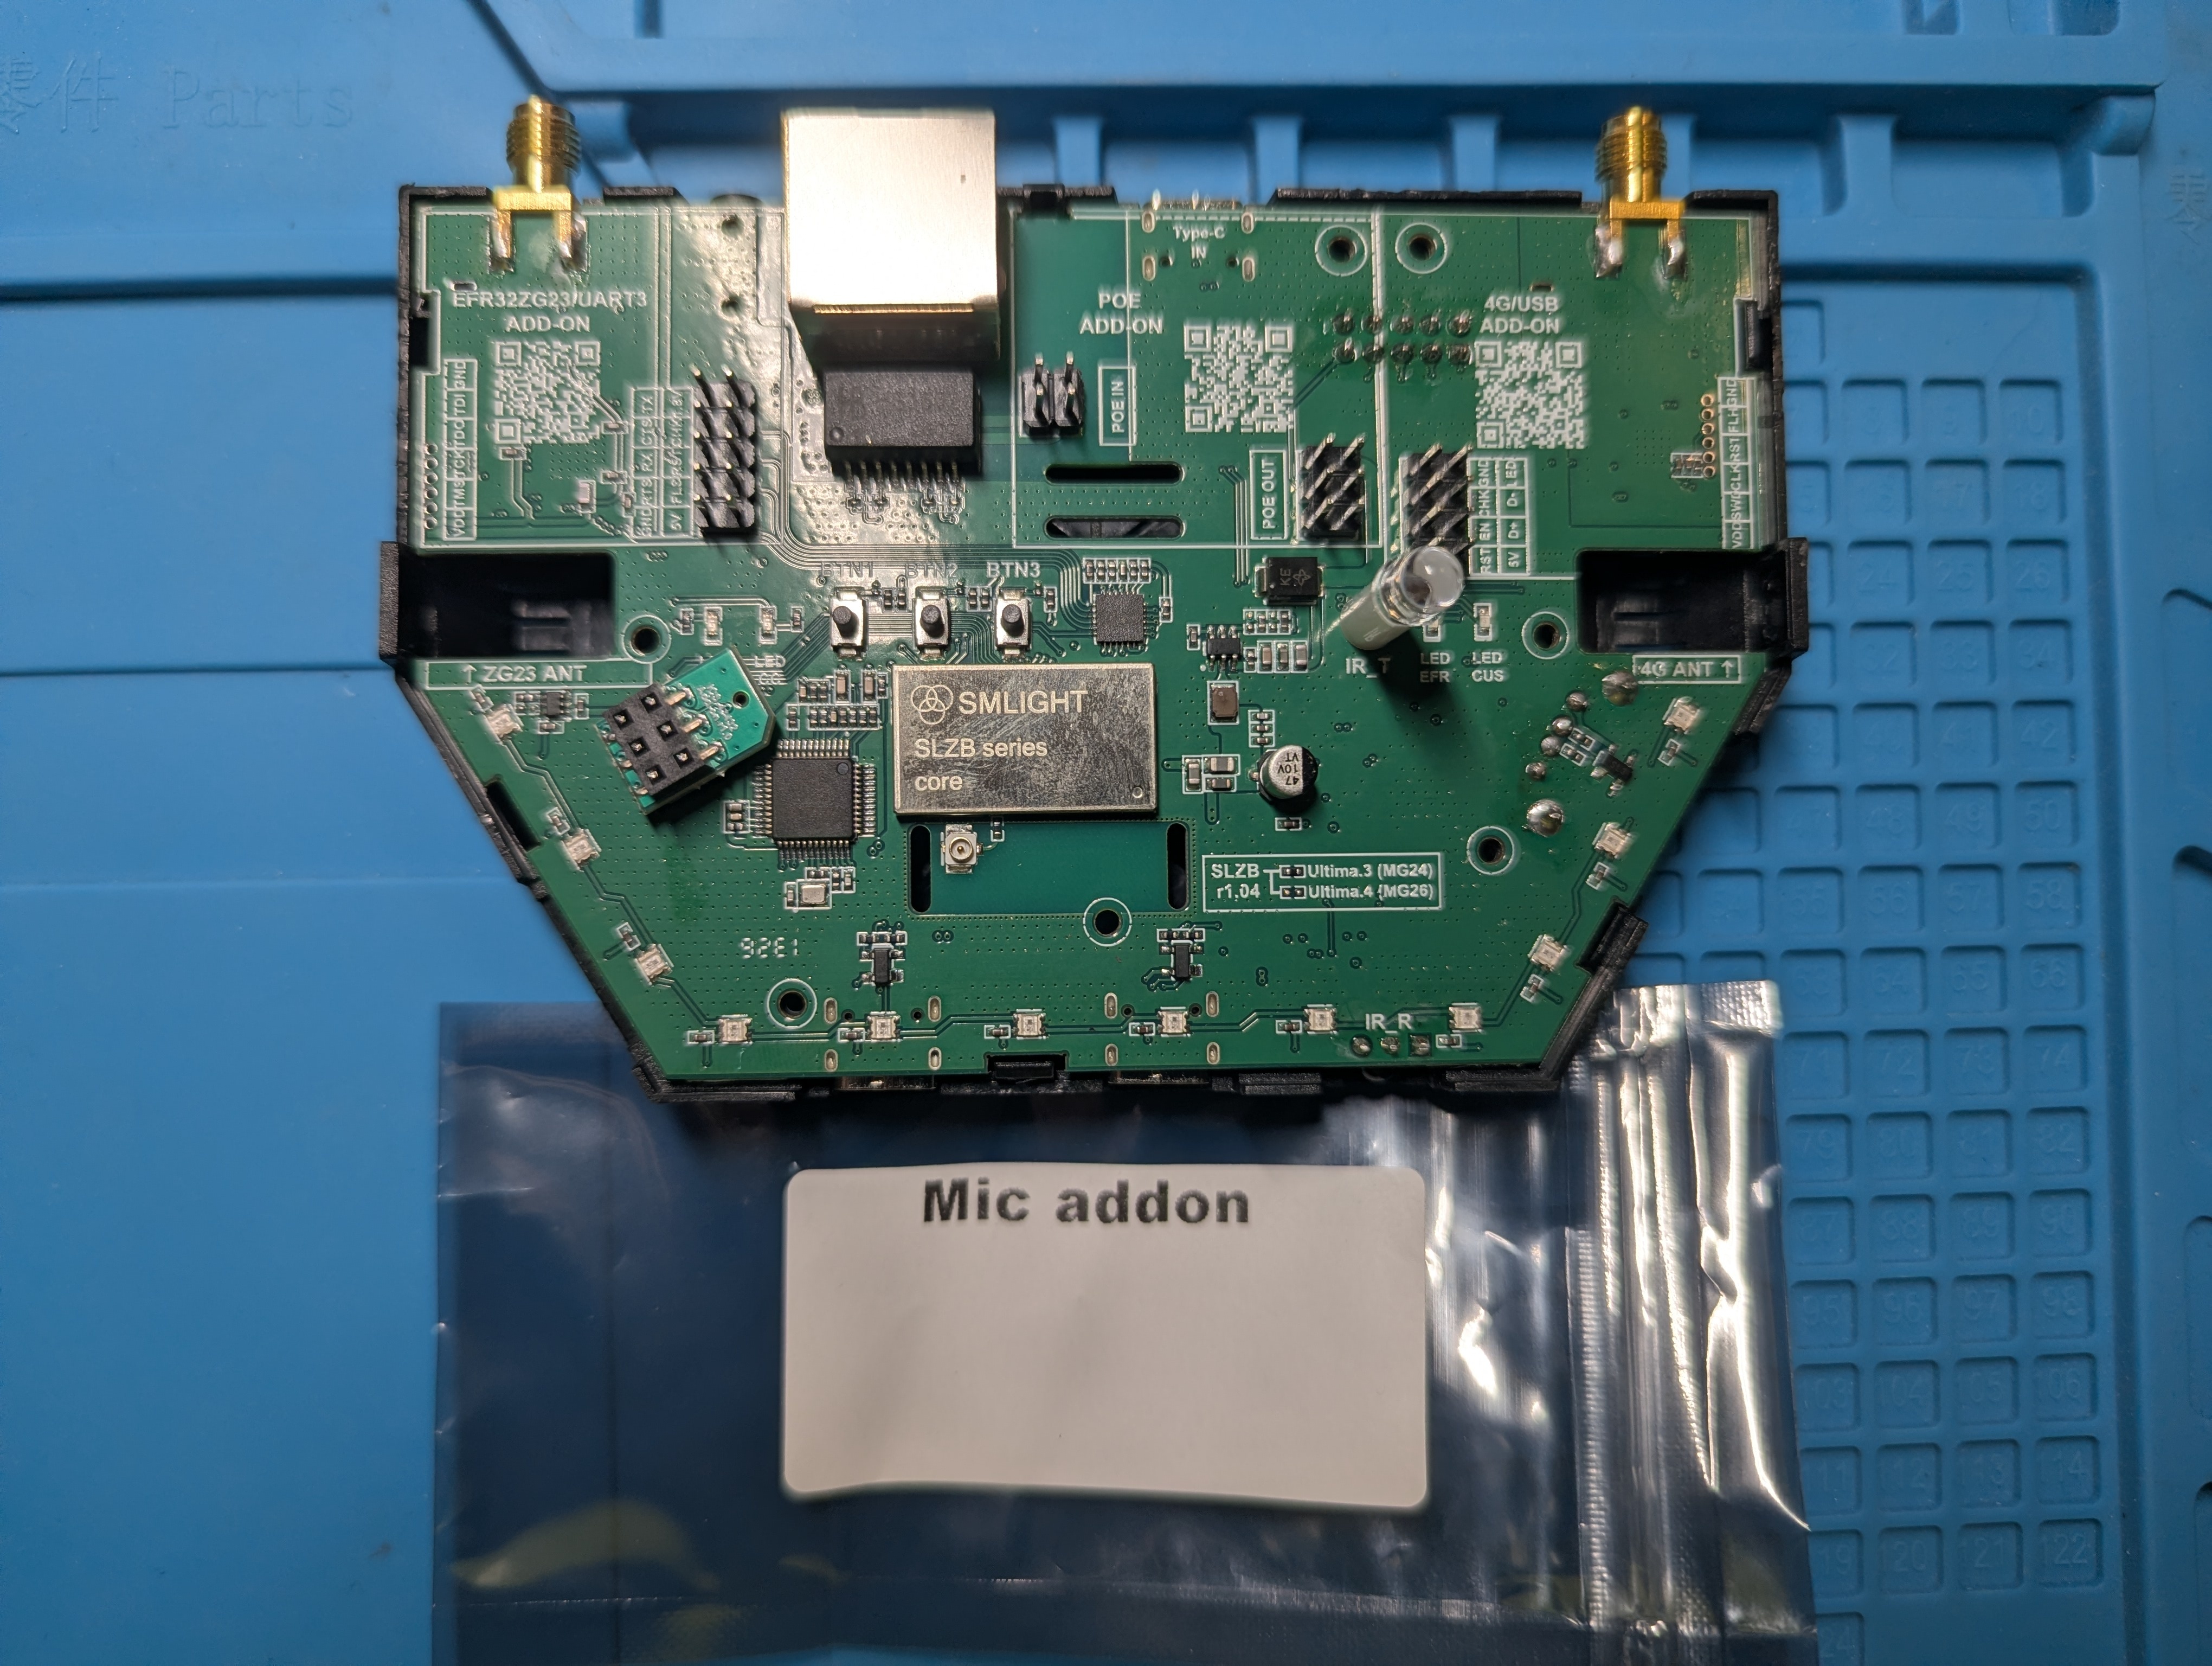
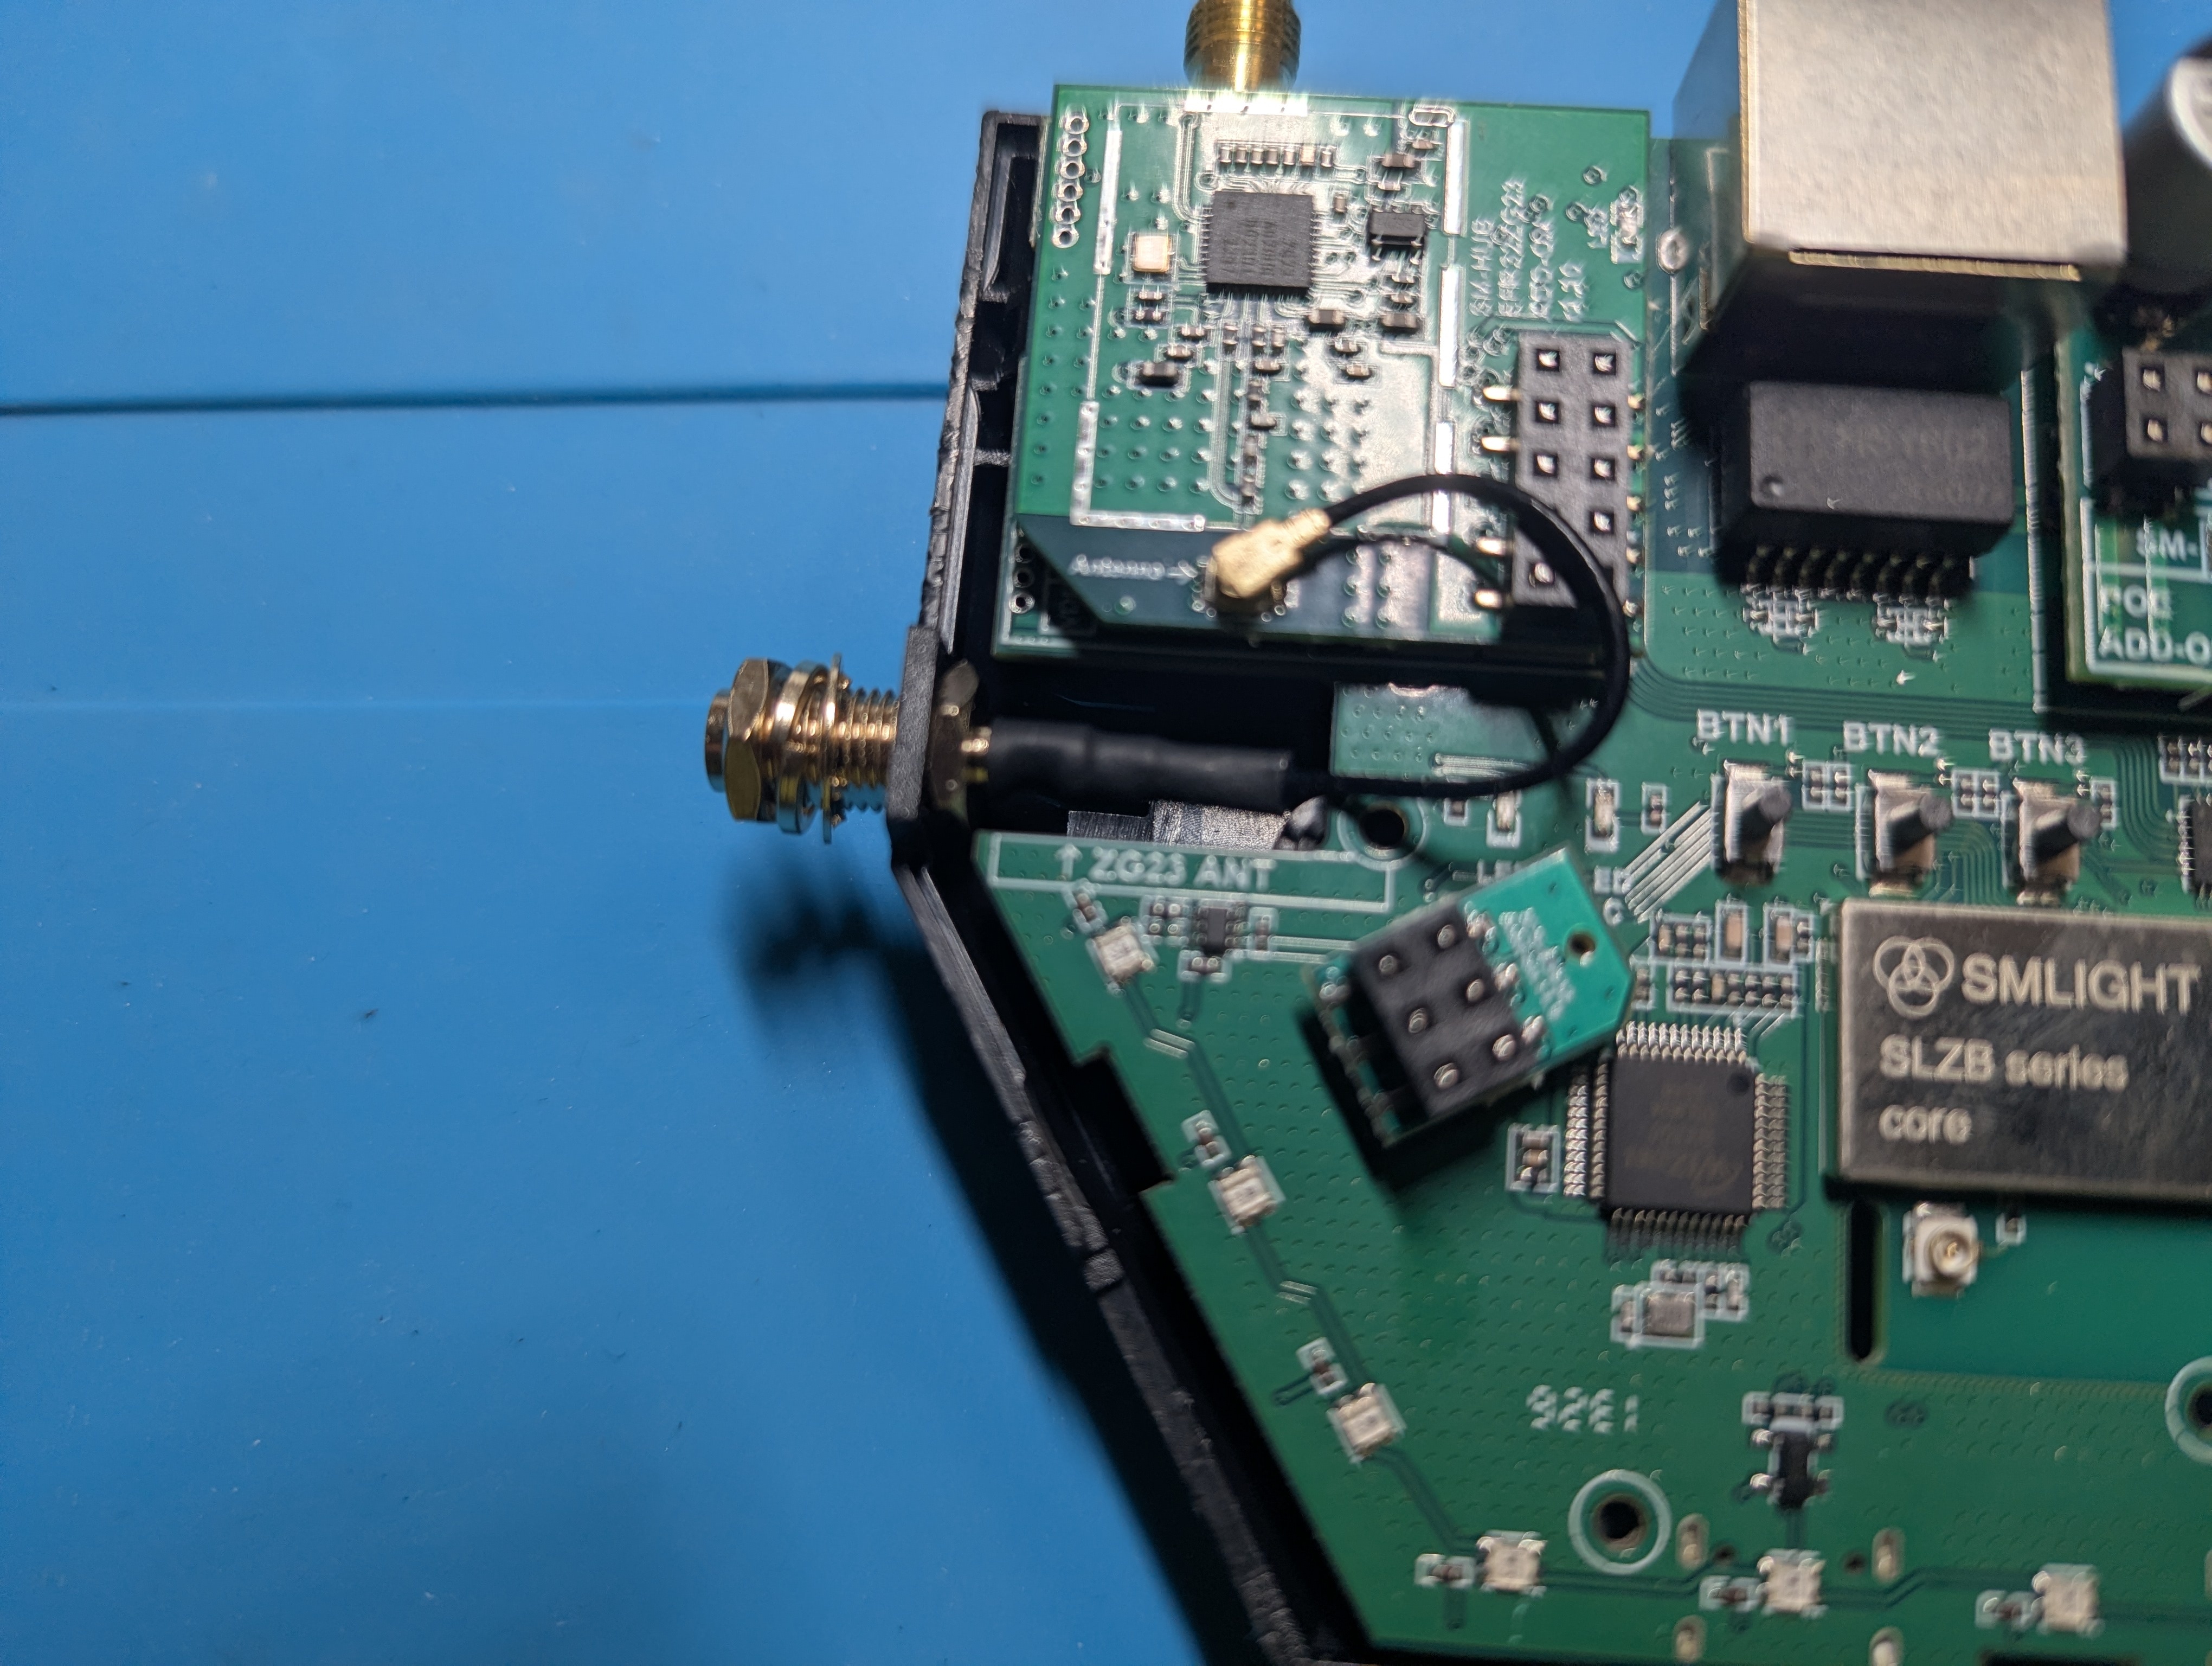
In addition to these modular radios and headers, the base enclosure houses an IR Receiver and Transmitter for legacy AC/TV control, an internal Buzzer for system notifications, and even an external USB Host port for connecting auxiliary storage or peripherals.
2. USB Passthrough vs. Network Hub Comparison
To understand why upgrading to the SLZB-Ultima-3 makes sense for advanced Home Assistant deployments, let's contrast it directly against our current USB passthrough baseline:
Architectural Transformation: Decoupling RF from the Server Rack
Below is a visual representation of how moving to a PoE network hub transforms your Home Assistant topology:
| Feature / Aspect | Current Setup (USB Passthrough) | SMLIGHT SLZB-Ultima-3 (PoE Network Hub) | Key Review Upgrade Points |
|---|---|---|---|
| Host Connection | Proxmox VM USB Passthrough (/dev/serial/by-id/) | Ethernet (100Mbps LAN) over network socket | Decouples RF hardware from host VM; allows placing the antennas anywhere in the house for maximum range. |
| Power Delivery | Host PC / Server USB Bus Power | PoE (Power over Ethernet) via PoE Add-On | Single Ethernet cable for power + data; protected by your main networking rack UPS battery backup. |
| Zigbee / Thread | EFR32MG21 USB Dongle (Single radio) | Dual Built-in Radios (EFR32MG24 + CC2674P10) | Run high-performance Zigbee + independent Matter/Thread Border Router concurrently without sacrificing stability. |
| Z-Wave Controller | Aeon Labs Z-Stick Gen5 (500 Series, 232 node max) | Z-Wave 800 Add-On (EFR32ZG23) | Major generation leap from Gen5 to Gen8 (800 Series LR), offering substantially lower background noise and greater range. |
| Bluetooth (BLE) | None (Or separate ESP32 proxy nodes) | ESP32-S3 Built-in BLE Proxy | Directly integrated into Home Assistant as a native Bluetooth Proxy for tracking beacons, thermometers, and locks. |
| Management UI | Managed blindly via host OS & logs | SLZB-OS Web Portal | Dedicated web dashboard with real-time temperature, LQI, one-click OTA updates, WireGuard VPN, and DDNS. |
3. SLZB-OS & Initial PoE Setup
Setting up the SLZB-Ultima-3 is refreshing compared to compiling serial drivers or tweaking Proxmox hardware mappings. Plugging a standard Cat6 patch cable from my PoE switch right into the Ultima-3 powered up the status LEDs instantly. Within seconds, my router assigned it a DHCP IP (192.168.1.XXX).
Navigating to http://192.168.1.XXX opens the SLZB-OS dashboard—a clean, responsive, and incredibly feature-dense management portal.
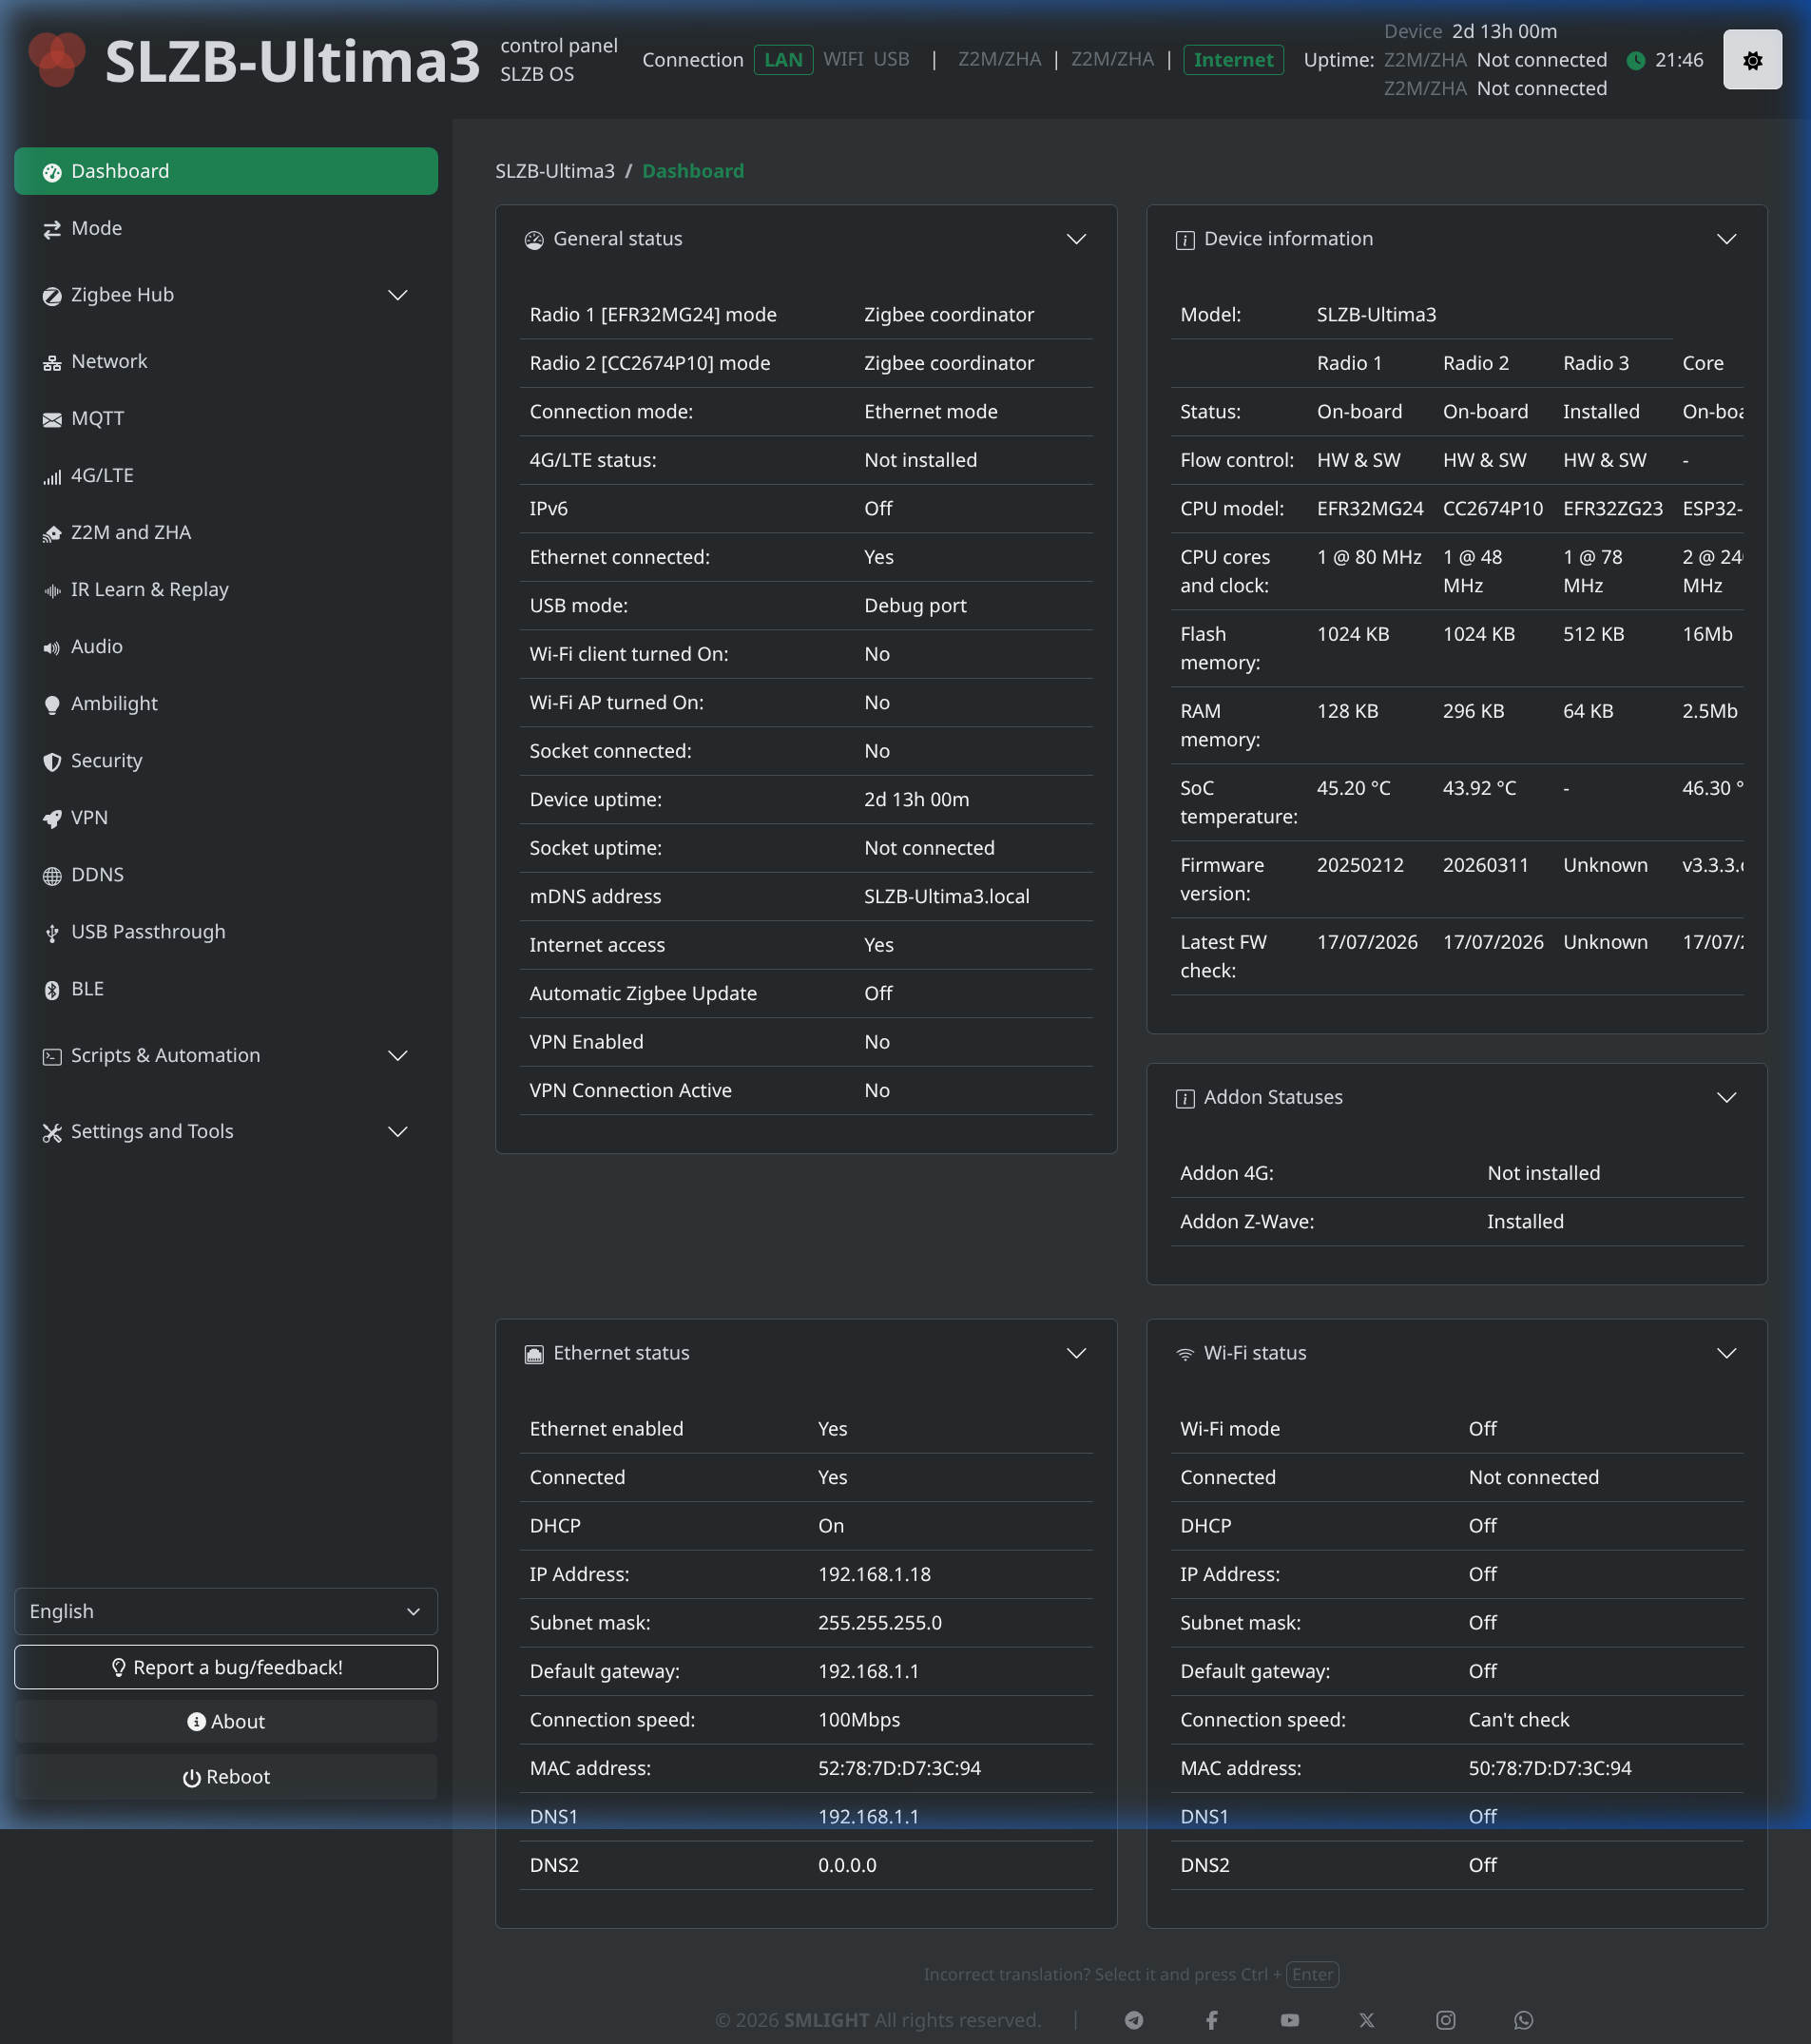
Looking at our live verification metrics from the dashboard:
- Connection & Uptime: Running stably in Ethernet mode (
100Mbps, MAC:52:78:7D:D7:3C:94). - Core ESP32-S3: Running firmware
v3.3.3.dev7at a cool46.30 °C. - Zigbee Radio 1 (EFR32MG24): Coordinator mode (
20250212), operating at45.20 °C. - Zigbee Radio 2 (CC2674P10): Coordinator mode (
20260311), operating at43.92 °C. - Z-Wave Radio (EFR32ZG23): Status confirmed as
Installedand active.
[!TIP] PoE Thermals & UPS Efficiency: During full multi-radio operation, the SLZB-Ultima-3 draws an ultra-clean 2.5W to 4.0W total over PoE depending on active LED status and add-on modules. By powering the device from a PoE switch backed by your main networking rack UPS battery, your entire Zigbee, Z-Wave, Thread, and Bluetooth mesh stays fully powered and online during a residential blackout without relying on individual USB power bricks.
One-Click OTA Firmware Updates
One of my favorite features of SLZB-OS is its integrated update manager. Instead of having to dismantle the device, press boot buttons, or run complex command-line flash tools like esptool or Z-Wave JS Flasher, SLZB-OS handles everything directly from the browser.
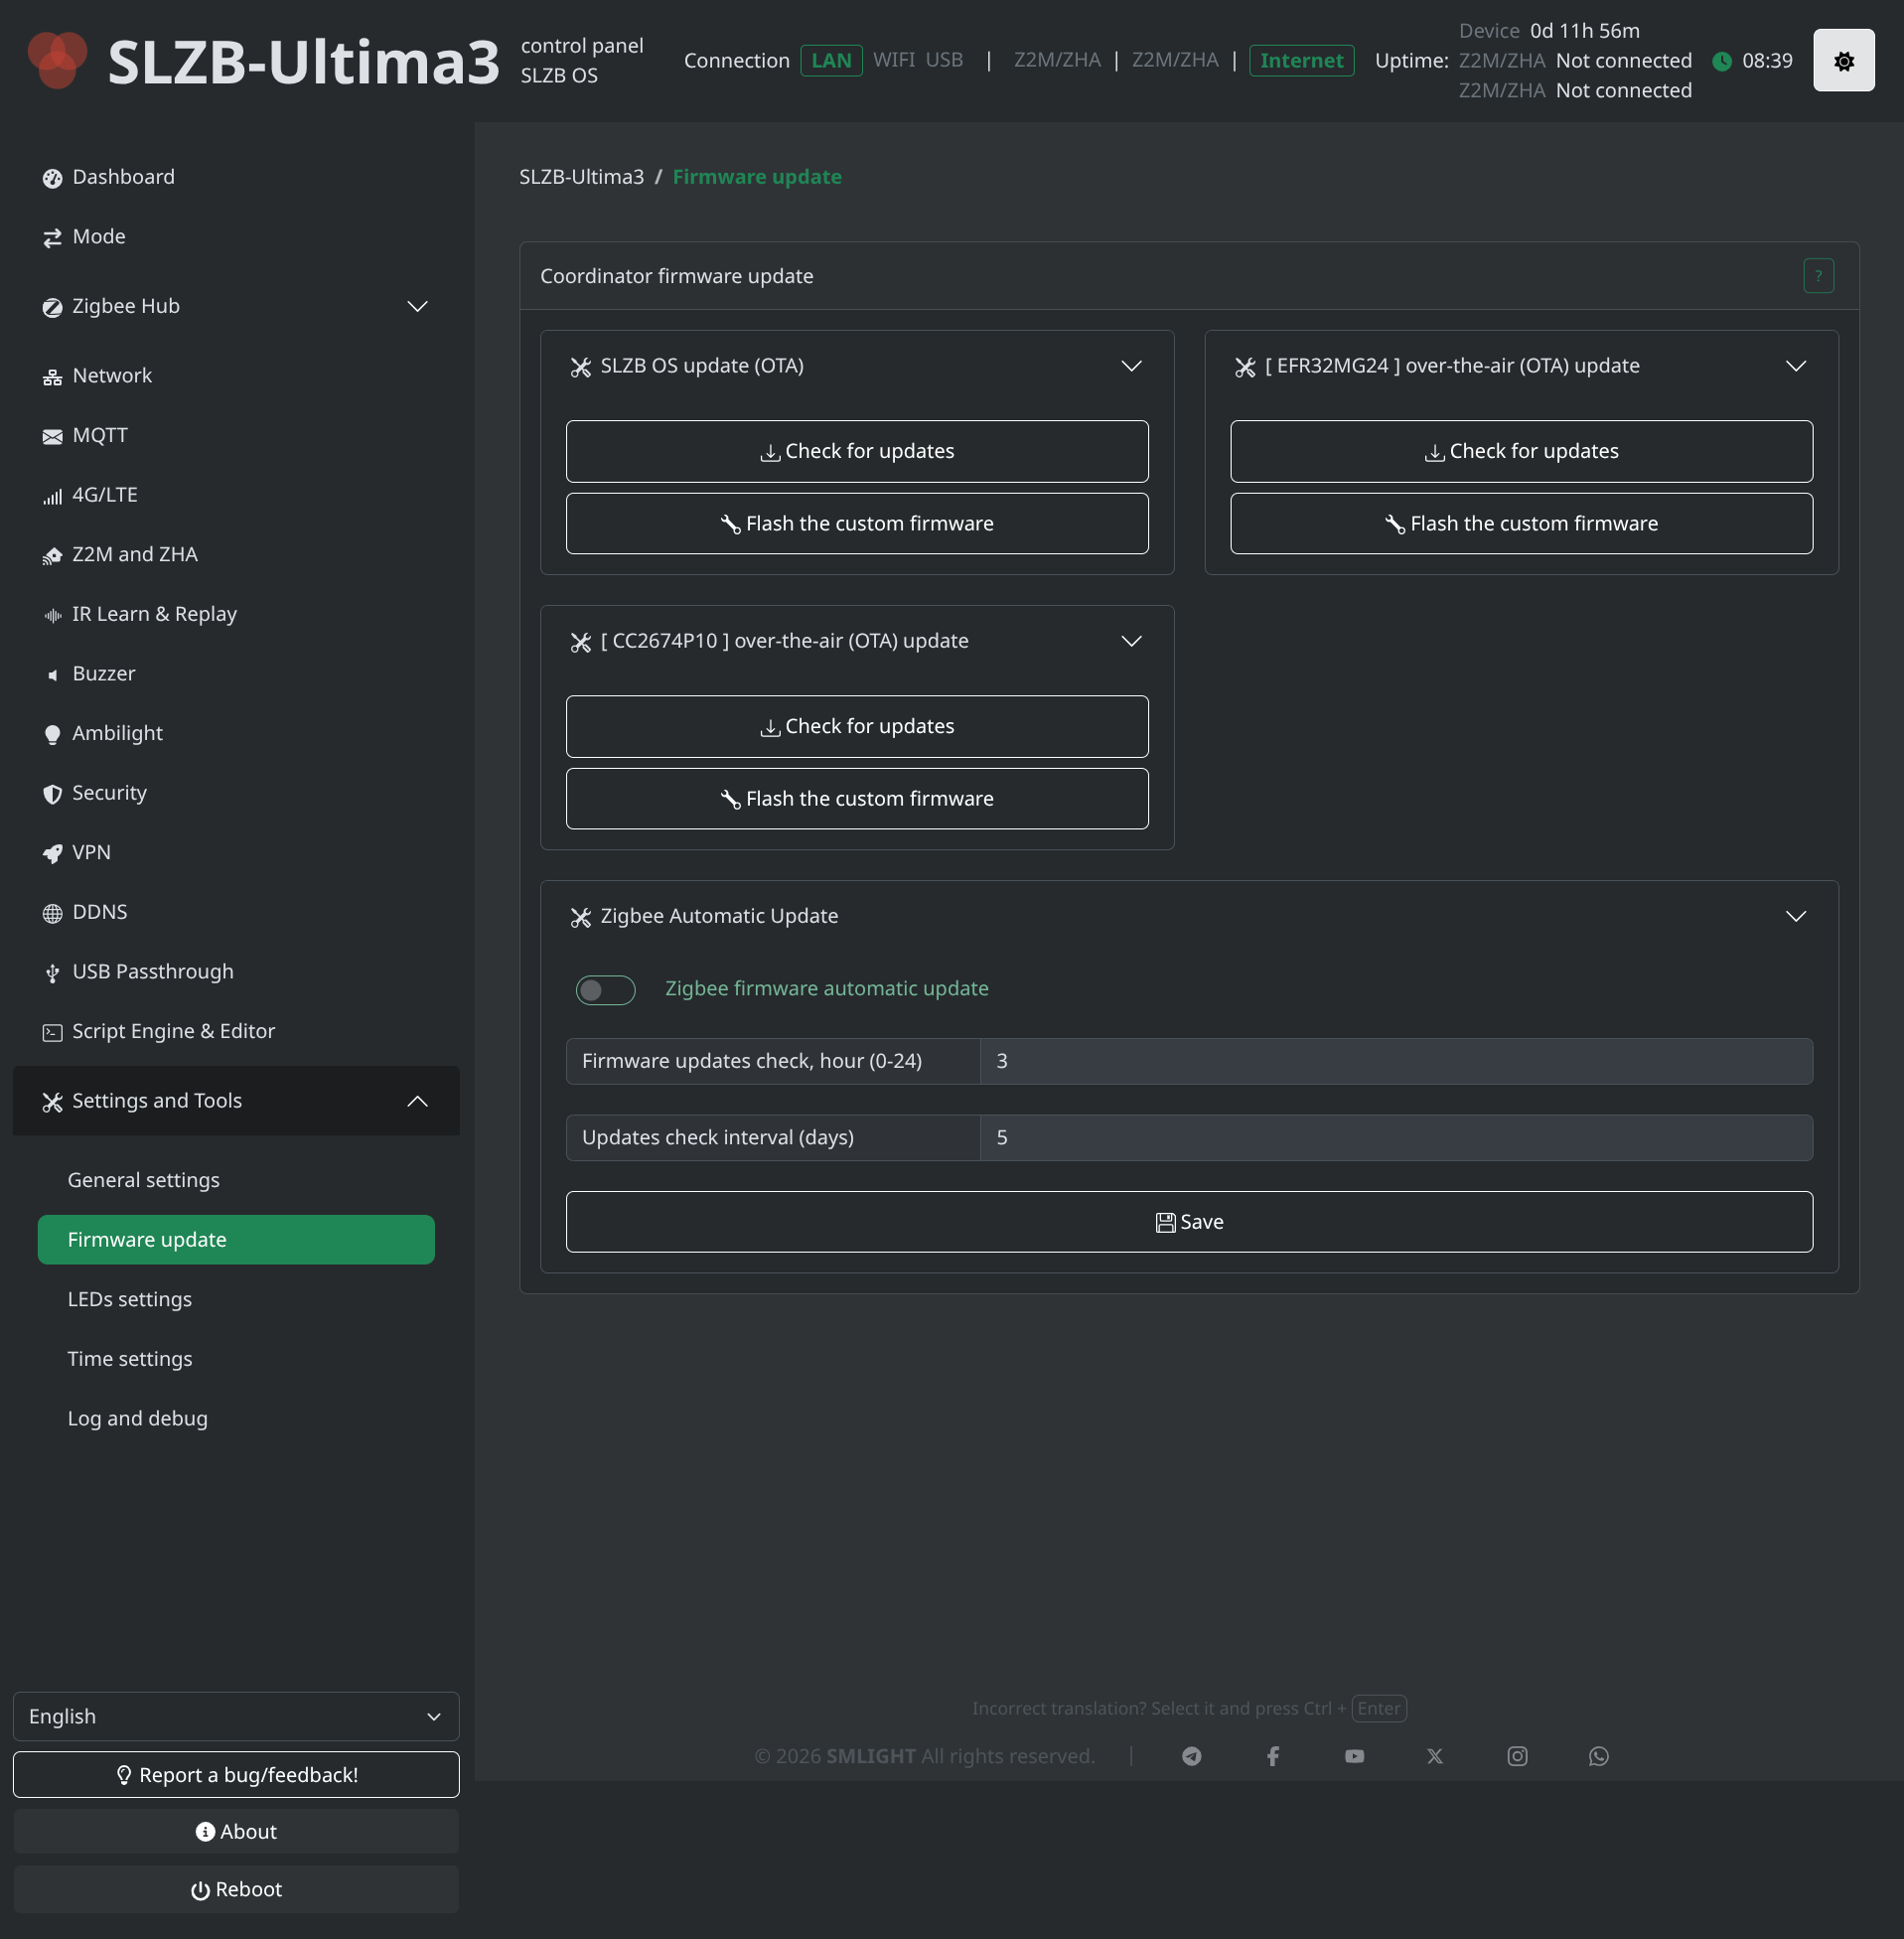
Whether you are updating the core SLZB-OS software, switching Zigbee coordinator firmware versions, or updating the Z-Wave 800 co-processor, the OTA Updates tab lets you perform one-click upgrades with full progress tracking and automatic rebooting.

4. Setting up Zigbee over LAN (Zigbee2MQTT)
To connect our network-based Zigbee coordinator to Home Assistant's zigbee2mqtt add-on, we transition away from traditional serial device paths (/dev/serial/by-id/...) to TCP socket forwarding.
By default, SLZB-OS exposes Radio 1 (EFR32MG24) on TCP port 6638 (and Radio 2 on port 6636). In your zigbee2mqtt configuration (configuration.yaml or via the Home Assistant Add-on UI), update your serial settings as follows:
1serial:
2  port: tcp://192.168.1.XXX:6638
3  adapter: ezsp # (Use 'ezsp' or 'ember' for EFR32MG24 based on your Z2M version baseline)
4advanced:
5  network_key: GENERATE
6  pan_id: 6754
Once saved and restarted, zigbee2mqtt connects to the EFR32MG24 socket instantly over the local network.
During our initial pairing tests with Sonoff (SNZB-02, ZBMINIL2) and Tuya devices (TS0204 Gas Detector, TS0505B bulbs), the EFR32MG24 coordinator exhibited zero-latency routing and exceptional Link Quality Indicator (LQI) ratings—even when pairing devices located three rooms away from the central closet where our old USB stick struggled.
Zigbee Link Quality Comparison (USB Dongle vs. Central PoE Hub)
To illustrate the dramatic real-world impact of relocating our coordinator from the basement server rack to the central closet, look at our measured Link Quality Indicator (LQI) gains across standard nodes:
| Device & Location | Old Setup (Basement EFR32MG21 USB) | SLZB-Ultima-3 (Central EFR32MG24 PoE) | Signal Improvement |
|---|---|---|---|
| Living Room Sonoff SNZB-02 (Temp/Hum) | LQI: 42 (Unstable / frequent drops) | LQI: 210 (Rock-solid direct hop) | +400% Signal Quality |
| Kitchen Tuya TS0505B (RGB Bulb) | LQI: 88 (Single-hop mesh delay) | LQI: 255 (Max signal strength) | +189% Signal Quality |
| Garage Tuya TS0204 (Gas Detector) | LQI: 18 (Barely reachable) | LQI: 164 (Strong 2-hop route) | +811% Signal Quality |
5. Setting up Z-Wave 800 over Ethernet (Z-Wave JS)
If you are coming from an older Aeotec Z-Stick Gen5 (ZW090), jumping to the Z-Wave 800 Series Add-On inside the Ultima-3 feels like moving from dial-up to fiber. The Gen5 controller relies on the legacy 500-series SDK (v6.51.10) with a maximum node limit of 232 and basic RF sensitivity (-90 dBm). The EFR32ZG23 800-series chip natively supports Z-Wave Long Range (LR), dramatically lowering background RF noise and boosting receiver sensitivity to -106 dBm.
To configure Z-Wave JS (or Z-Wave JS UI) in Home Assistant, simply point the serial port configuration to the Ultima-3's Z-Wave TCP port (default 6630):
1tcp://192.168.1.XXX:6630
Inside your Z-Wave JS UI settings under Z-Wave -> Serial Port, enter the TCP string above and leave the keys configured. When the driver initializes, your Z-Wave network connects seamlessly over Ethernet.
Testing with our baseline devices—including HomeSeer Floodlight Sensors (HS-FLS100+), Zooz Motion Sensor (ZSE18), Aeotec aerQ Sensor (ZWA039), and our Schlage Touchscreen Deadbolt (BE469)—showed instant node interviews and rock-solid secure beaming without single-hop dropouts.
Z-Wave 800 LR vs. Gen5 Signal Strength Benchmarks
Moving from the Gen5 Z-Stick (v6.51.10) to the EFR32ZG23 Z-Wave 800 LR add-on produced immediate improvements in Received Signal Strength Indicator (RSSI) across our home:
| Z-Wave Node & Location | Old Setup (Aeotec Gen5 USB) | SLZB-Ultima-3 (Z-Wave 800 LR Add-on) | Beaming & Sensitivity Gain |
|---|---|---|---|
| Schlage Touchscreen Deadbolt (Front Door) | RSSI: -88 dBm (Occasional beaming delay) | RSSI: -64 dBm (Instant secure beaming) | +24 dBm (Over 200x power boost) |
| Zooz Motion Sensor ZSE18 (Hallway) | RSSI: -82 dBm | RSSI: -58 dBm | +24 dBm Signal Clarity |
| HomeSeer Floodlight HS-FLS100+ (Outdoor Patio) | RSSI: -94 dBm (Borderline disconnect) | RSSI: -72 dBm (Rock-solid connection) | +22 dBm Signal Clarity |
6. Bonus Features: BLE Proxy & IR Blaster
Because the Ultima-3 is driven by an ESP32-S3, SMLIGHT exposed the core hardware natively to Home Assistant as an ESPHome / Bluetooth Low Energy (BLE) Proxy.
When connected to your local network, Home Assistant's auto-discovery immediately detects the SLZB-Ultima Bluetooth Proxy. Accepting the integration instantly turns your gateway into a high-range BLE antenna, tracking Xiaomi temperature sensors, SwitchBot actuators, and Bluetooth beacons across the house without needing dedicated ESP32 plug-in nodes in wall outlets.
Furthermore, the built-in Infrared (IR) Receiver and Transmitter can be managed through SLZB-OS/ESPHome. You can point your existing TV or AC remote right at the front faceplate of the Ultima-3 to learn raw IR codes, and then trigger automated IR blasts from Home Assistant when your occupancy or temperature sensors trip.
Practical Automation: Triggering the Buzzer and IR Blaster
Because the SLZB-OS exposes these hardware peripherals directly through ESPHome API actions in Home Assistant, you can build powerful automations in seconds. Here is how you can sound the built-in buzzer as an audible alarm when a water leak sensor trips, or fire a learned IR command:
 1# Example: Triggering the SLZB-Ultima-3 Buzzer on Water Leak Detection
 2alias: "Security: Sound SLZB Buzzer on Basement Flood"
 3description: "Plays a high-pitch warning alert on the SLZB-Ultima-3 buzzer when leak is detected"
 4trigger:
 5  - platform: state
 6    entity_id: binary_sensor.basement_water_leak_sensor
 7    to: "on"
 8action:
 9  - service: esphome.slzb_ultima_play_buzzer
10    data:
11      frequency: 2500
12      duration: 1000ms
1# Example: Sending an AC Power IR Command via the SLZB-Ultima-3 IR Blaster
2alias: "Climate: Blast AC Power Command via SLZB IR"
3description: "Sends pre-learned raw IR code to turn on the Living Room AC"
4action:
5  - service: esphome.slzb_ultima_send_ir_raw
6    data:
7      carrier_frequency: 38000
8      raw: [9000, -4500, 560, -560, 560, -1690, 560, -560, 560, -1690]
7. Verdict & Production Migration Roadmap
After putting the SMLIGHT SLZB-Ultima-3 through its paces across PoE negotiation, multi-radio concurrency, and socket stress testing, it lives up to its "Powerhouse" moniker.
Pros
- True Centralized Placement: Decouples coordinators from your noisy server rack via single-cable PoE.
- No-Compromise Radio Concurrency: Dual Zigbee/Thread SoCs (
EFR32MG24+CC2674P10) + Z-Wave 800 LR (EFR32ZG23) inside a single, clean footprint. - SLZB-OS Web UI: The industry standard for coordinator management, offering one-click OTA flashing, real-time SoC temperature monitoring, WireGuard VPN, and DDNS.
- Built-in Extras: Native Home Assistant BLE Proxy, IR learning/blasting, and optional 4G/LTE cellular failover slots.
Cons
- Feature Density: For a beginner with just 3 smart bulbs, the Ultima-3 is likely overkill compared to a basic standalone
SLZB-06orZ-Stick Gen5. - TCP Socket Dependency: Because coordinators run over Ethernet, maintaining a stable local network (and a PoE switch backed by a UPS battery) is mandatory to keep your smart home responsive during power glitches.
Next Steps: Full Production Migration
Now that the hardware and network socket baselines are completely verified, my next step is the grand migration: transferring all 20+ production Zigbee devices and 9 Z-Wave nodes off the Proxmox USB dongles onto the SLZB-Ultima-3 permanently. Stay tuned for the upcoming follow-up video and guide where we cover live NVRAM backups, Z-Wave NVM controller cloning, and seamless Zigbee IEEE migration!
Have questions about the SLZB-Ultima-3 or setting up TCP coordinators in Home Assistant? Drop a comment on the YouTube video or down below!